Quite possibly the best part about WordPress is that it simplifies our writing and blogging experience in various ways. For instance, the WYSIWYG editor ensures that users who are not well versed with code do not have to deal with code. Similarly, the Publicize feature of Jetpack ensures that your posts are shared across social media platforms without you having to worry about it.
That said, what if one does not wish to login to the WordPress Dashboard each time a post needs to be published? Since blogging on the go is gaining momentum and time is too less to spend logging into the WordPress admin panel all the time, how about we take a shortened route to publishing? Like, publishing posts via email?
Yes, WordPress makes it possible for us to publish blog posts via email. In this article, I will be outlining the steps that are needed to publish blog posts via email.
How to Publish Blog Posts in WordPress Directly via Email
There are no third-party plugins or tools needed if you wish to blog directly via email. WordPress comes with native support for this feature — all it takes it some tweaking and configuration, and we are good to go!
Step 1: Setting Up The Email
Since we will be using the email to post to our blog, we first need to set up an email account for this purpose. Now, technically speaking, you can use any email account to post to your blog, but there are certain metrics that you need to bear in mind.
First up, your email service provider must have support for POP3 access. Nearly all major email services, such as GMail, Yahoo, and Outlook, offer POP3 support. Similarly, if you are using a custom email service for your domain, may be powered via your web hosting server, check with the provider to see if they offer support for POP3.
Step 2: Creating an Email
Next, when creating an email account for posting, try to make it as impossible to guess as possible. my_wp_blog_email@gmail.com is a horrible idea: 2wefgbhg8u93jnifhrnidf@gmail.com is much better. Any email that is sent to this address will be added as a post, so it is wiser to ensure that the email address is nearly impossible to guess. Having your own custom domain is another plus, as you can choose any username and the custom domain ensures that guess-work is less likely.
Step 3: POP3 Access
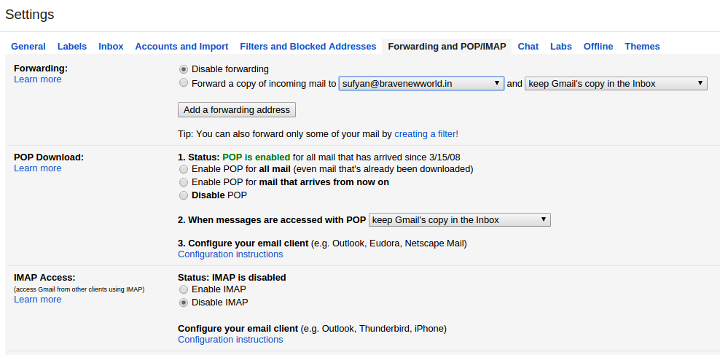
Now that we have the email account sorted, we need to ensure that POP3 is enabled. Different providers use different methods to turn on POP access, and if you are using your own domain, check with your hosting provider for help on this. Since GMail is what I use and is the most popular service out there, here is how to turn POP on for it:
Head to Settings, and then choose Forwarding and POP/IMAP.
Thereafter, enable POP for all email, and you are all set.

Be sure to save the changes.
Step 4: Setting up WordPress
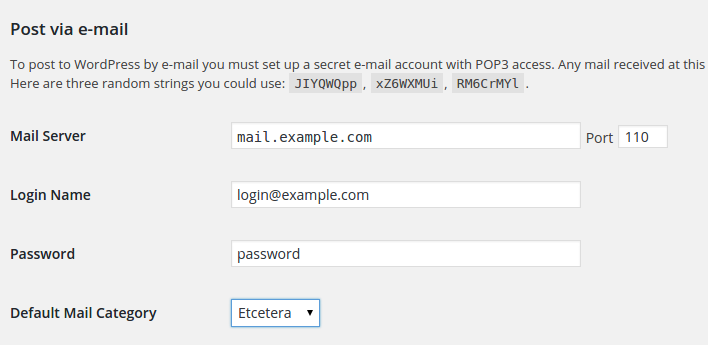
Now, we need to setup WordPress to receive our blog posts via email. The concerned section is Settings–>Reading.
Navigate to the Post via Email sub-section, and then fill up the details. The login name and password will depend on the account you created, and the mail server and port details vary from one provider to another. For GMail, the mail server is pop.gmail.com, whereas for Yahoo!, the mail server is pop.mail.yahoo.com — GMail generally uses port 995, but most other free email providers, like Outlook, use port 110. If you are using a custom email domain, check with your hosting provider.

You can also specify the default category for the posts you send via email: these are marked as Uncategorized by default, but you can override that setting here.
Once done, simply hit Save, and you have configured WordPress to publish posts via email.
Points Worth Noting
Now that your email is set up and you have configured WordPress as well, nothing is stopping you from posting via email. Here are some extra points that you need to bear in mind:
- The Subject line of your email becomes the Post Title in WordPress.
- You can insert images and other media in-line in the email body itself. Attachments, however, will not work. So if you wish to have a cat.jpg file in your blog post, insert it within the email content, do not attach it separately and say “file attached” in the email.
- Since most email providers offer formatting tools for email, you can have bold and italics, and so on.
- Note that the email address to which you are emailing to should be the secret one that you created; whereas the email address to which you are emailing from should preferably be an admin email address on your WordPress blog. If you send the email from a non-admin address, it will be saved as draft (post will not go live automatically).
Over To You
That’s all you need to know when publishing posts via email to your WordPress blog. Since email is something everyone uses or checks multiple times a day, setting up your blog to receive posts via email can really make blogging easier. Imagine yourself being in a train, with email access on your smartphone, and writing down and publishing the post directly!
What do you think of publishing blog posts via email? Ever given it a spin? Share your views in the comments below!


Leave a Reply