LifterLMS will be one of the solutions that you see often on your hunt for a Learning Management System (LMS). It’s a popular choice to build online courses, and my LifterLMS review will discuss the ins and outs of the WordPress plugin.
Your main concern will likely be whether the plugin is suitable for your needs when creating an online learning platform. After all, there are plenty of other WordPress LMS plugins that also are worthy of your attention.
Here’s how I’m going to divide up my LifterLMS review:
- 🧰 A quick overview of the features
- 👷 A look at the drag-and-drop course builder
- 💳 How you can charge for your courses using LifterLMS’ payment options
- 💰 How much LifterLMS costs
- 👍👎 Pros and cons
- 🏁 Conclusions
LifterLMS is a dense plugin that deserves a thorough look. With this in mind, I’m going to start with what it can offer you.
🧰 LifterLMS Review: Its Features and Functionality
At its core, LifterLMS is a WordPress plugin and learning platform that gives you almost everything you need to build and launch courses, manager your learners, and scale your provision. It does this through a robust set of core functionality:
- Course creator. It uses a drag-and-drop builder to help you create courses. This is the primary focus of the plugin, and I’ll look at this in detail later on in the LifterLMS review.
- Content protection. It’s important to lock down your content for paying students, and you have lots of protection here. The content restriction functionality is solid, and you have full control over how your implement it.
- Memberships and payments. You can provide courses and even general site access as typical memberships, implement automatic enrollment, set members-only pricing, and more. There are also flexible ways for students to pay, such as through credit cards, recurring payments, or a custom pricing model.
- Student engagement. Making sure your students are enjoying their learning is vital for retention and high pass rates. LifterLMS lets you assign achievement badges, community social learning, direct messaging, private coaching, and much more.
You’ll also find plenty of third-party integration options here too. For instance, you can add email marketing support through WP Fusion, Kit, or Mailchimp. There are direct integrations with popular WordPress plugins such as Gravity Forms, WPForms, Ninja Forms, and Formidable Forms. For anything that doesn’t have a defined integration, you can rely on Zapier to connect your services.
However, I want to look at the main aspect of LifterLMS next: the drag-and-drop course builder.
👷 LifterLMS Review: the Course Builder
Creating an online course—much like any type of complex content—can take a lot of time and effort. This is because of the many moving parts a course requires, such as your curriculum, study materials, questions and tests, and even design and presentation. What’s more, you need to be able to manage and organize both course materials and learners for efficiency.
To help make this as painless as possible, LifterLMS provides a drag-and-drop course builder. This lets you set up the ‘big picture’ structure for your course, then dig into more detailed sections when necessary.
Creating a Course: Building the Overview
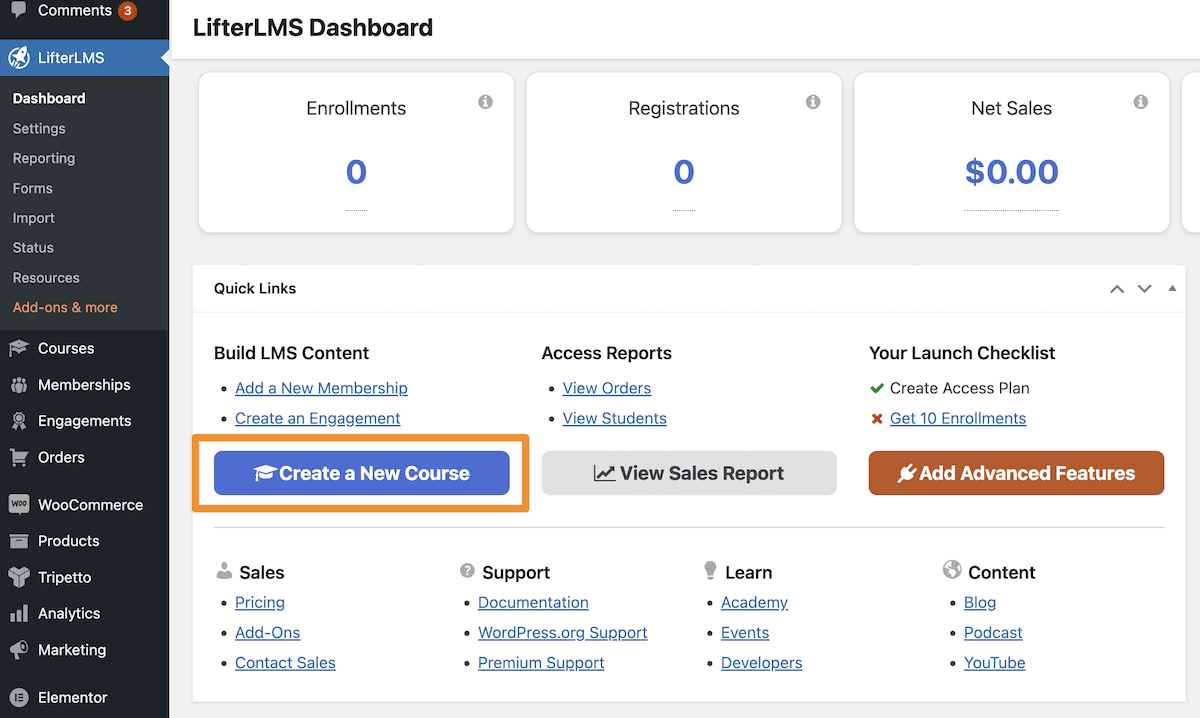
Let’s go over how to create a course. Note that I’m not going to get into the installation process here, as it follows a typical approach. Regardless, from the LifterLMS dashboard, click the Create a New Course button:
This will bring you to the native WordPress Block Editor. This will let you set up the course overview content and make some basic settings:
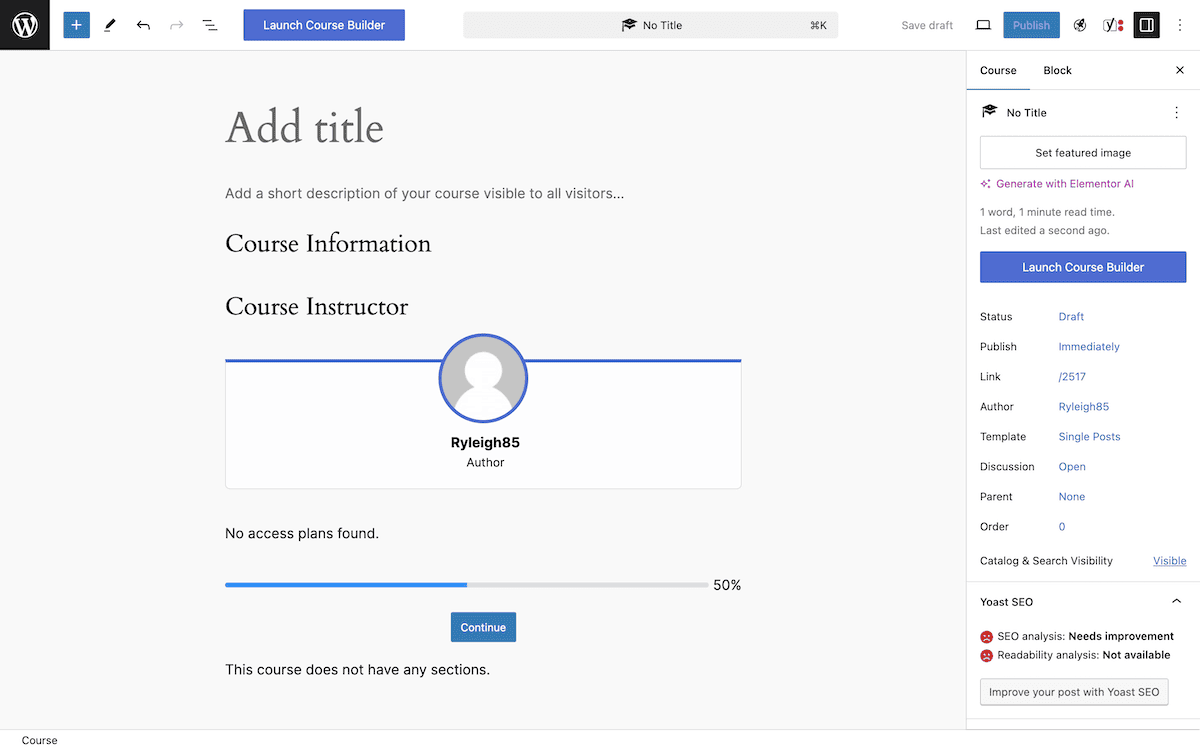
There are some dedicated LifterLMS Blocks on this screen that let you add course description, showcase the course information and instructor, and details course access.
If you scroll further down, you’ll see the Course Options metabox along with others for student management and course access.
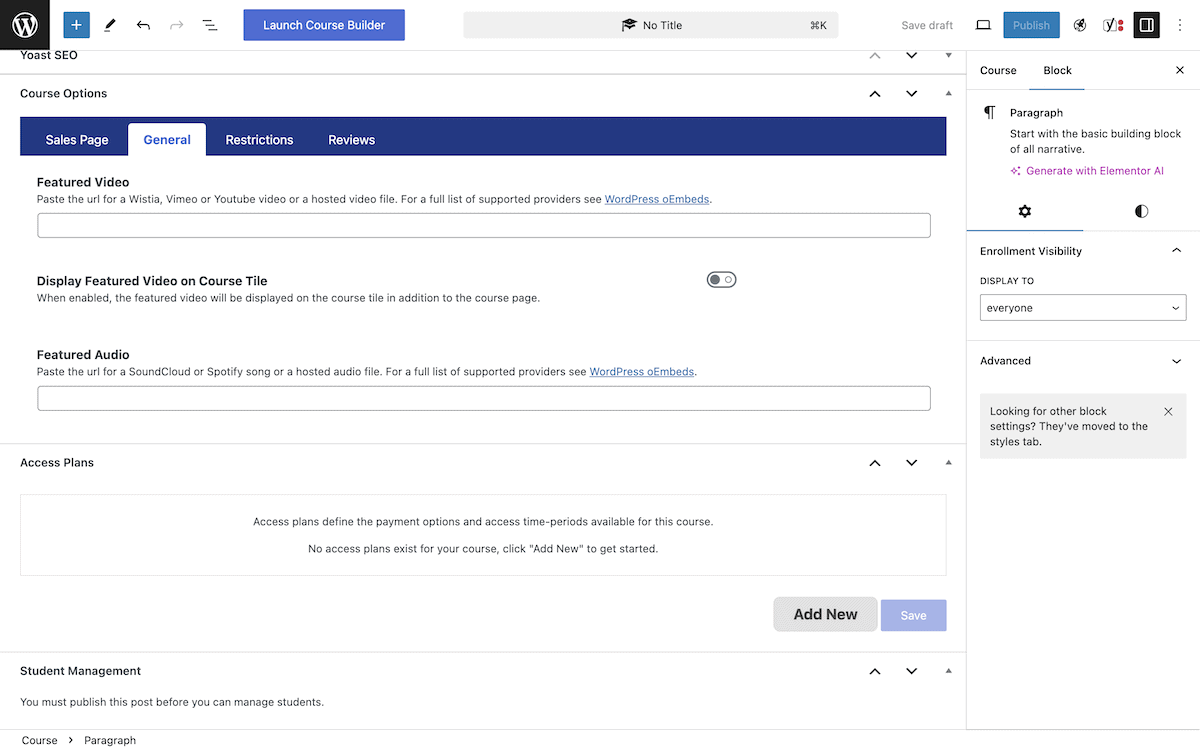
This is where you set options such as the estimated completion time for the course, any necessary prerequisites, and other incidental information. You’ll also set up your course payment options here, which I’ll look at shortly.
Once you finish here, you can click the Launch Course Builder button either from the Course tab of the right-hand sidebar or at the top of the screen. This will save your changes and bring you into the dedicated course builder for LifterLMS.
Creating a Course: Using the Drag-and-Drop Course Builder
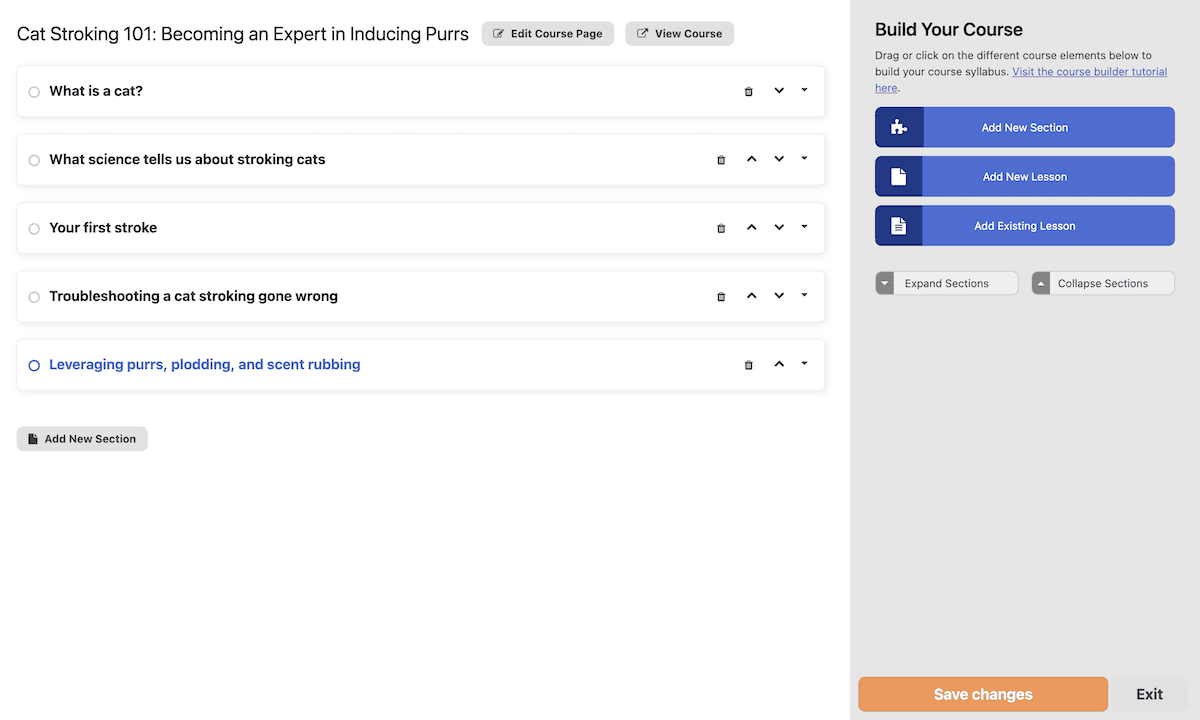
At first glance, the course builder looks sparse, but will quickly become full with your course’s lessons. There are two fundamental organization aspects:
- Lessons: The content of your course.
- Sections: These help you organize lessons into different categories and units.
Using the course builder, you drag elements onto the page to create the high-level structure of your course. For instance, I’ve used sections to help break up the future lessons into logical topics:
Next, you can add lessons. Each lesson offers a set of options to help you tailor it to your needs. Choosing the Settings link will pop out a sidebar that lets you set the lesson name, media embeds, whether the lesson is free, and the drip content style:
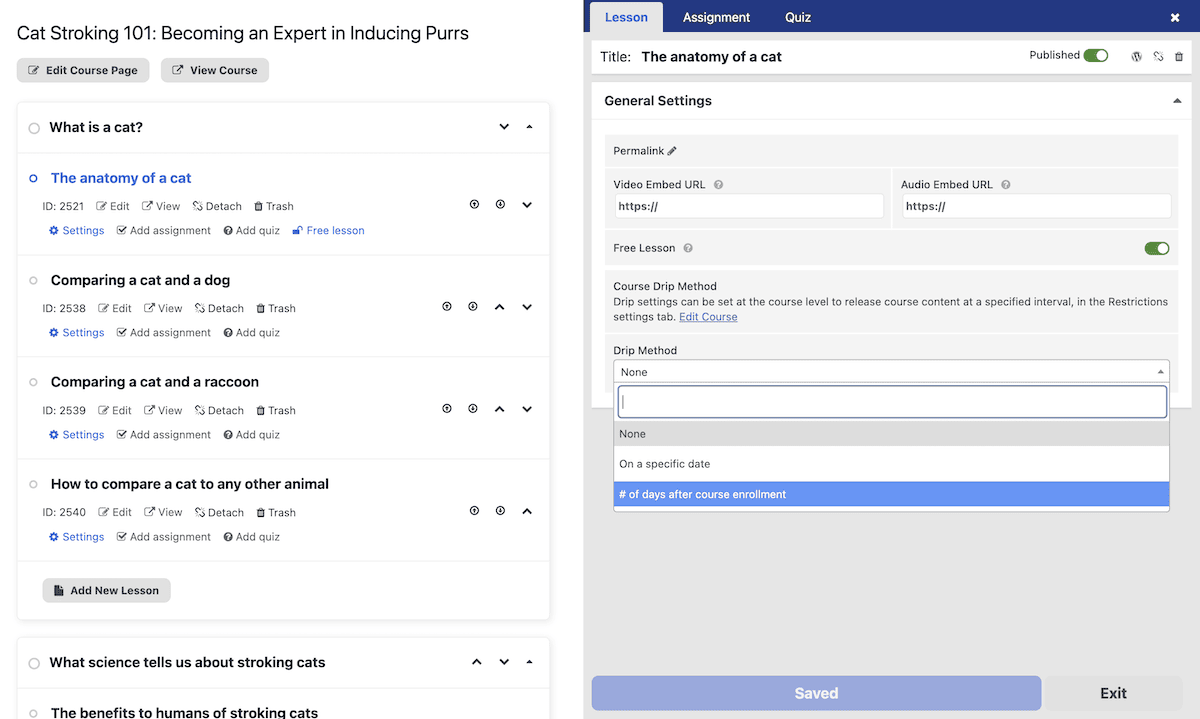
You can also work with other LifterLMS functionality here, such as assignments, quizzes, and more. Often, creating a lesson is fluid, in that you’ll flit between each of the ways to build your course throughout the creative process.
Creating a Course: Implementing Assignments and Quizzes
Assignments and quizzes represent the two ways LifterLMS lets you test student knowledge on a subject. The difference is that assignments are more ‘in-field’ tests: think essays, tasks, completion steps, and file uploads. Quizzes represent ‘sitting’ tests: mid-terms, end of lesson comprehension, and end of course assessments.
They are add-ons for LifterLMS, which requires a premium subscription (I’ll discuss this soon). You can add both from the course builder’s dedicated tabs whenever you click on a lesson:
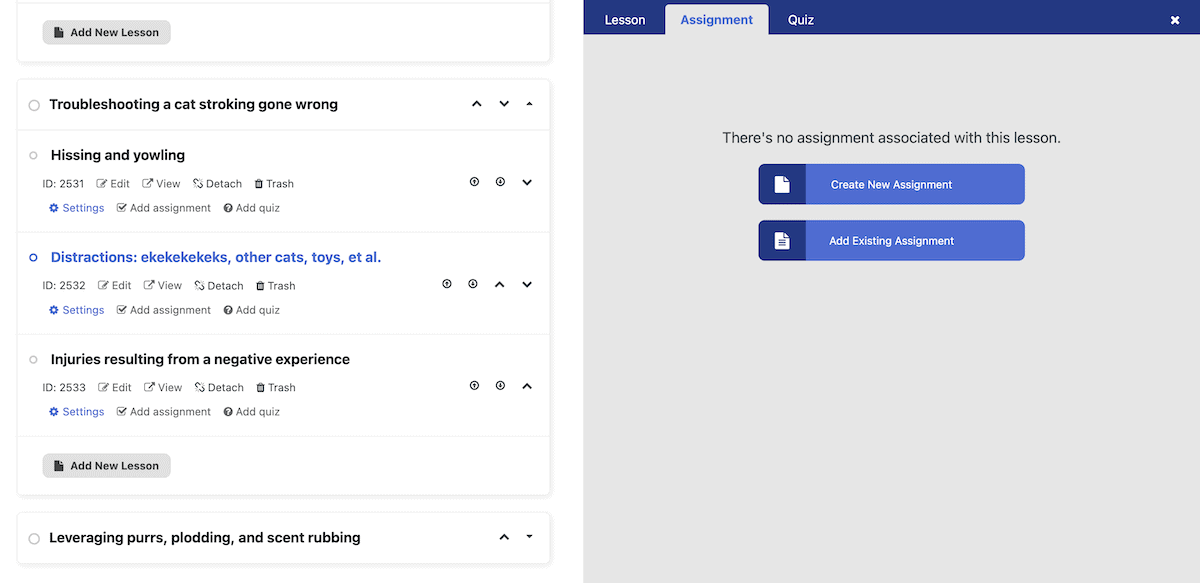
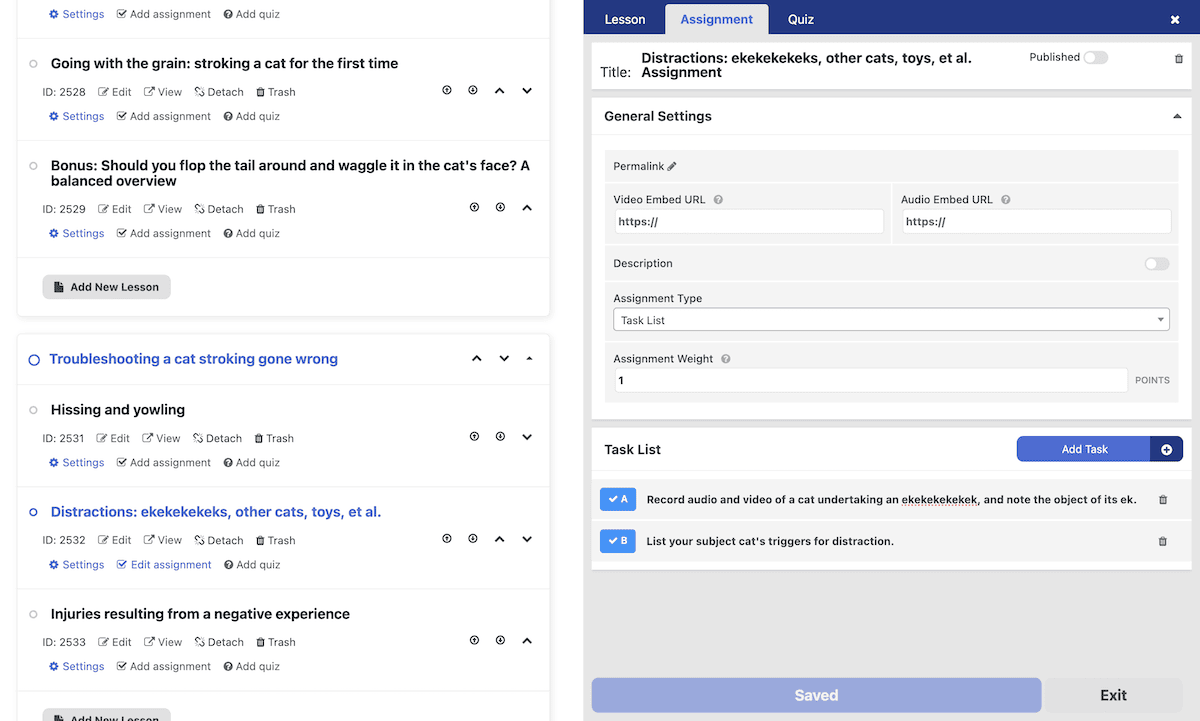
This displays another pop-out that looks similar to the lesson setting screen. This time, there is space to choose an assignment type (an essay, task list, or upload), and room to add any relevant materials:
For quizzes, you’ll see a version of the WordPress Classic Editor along with options relevant to taking a test. This includes a passing rate, question creator, and others:
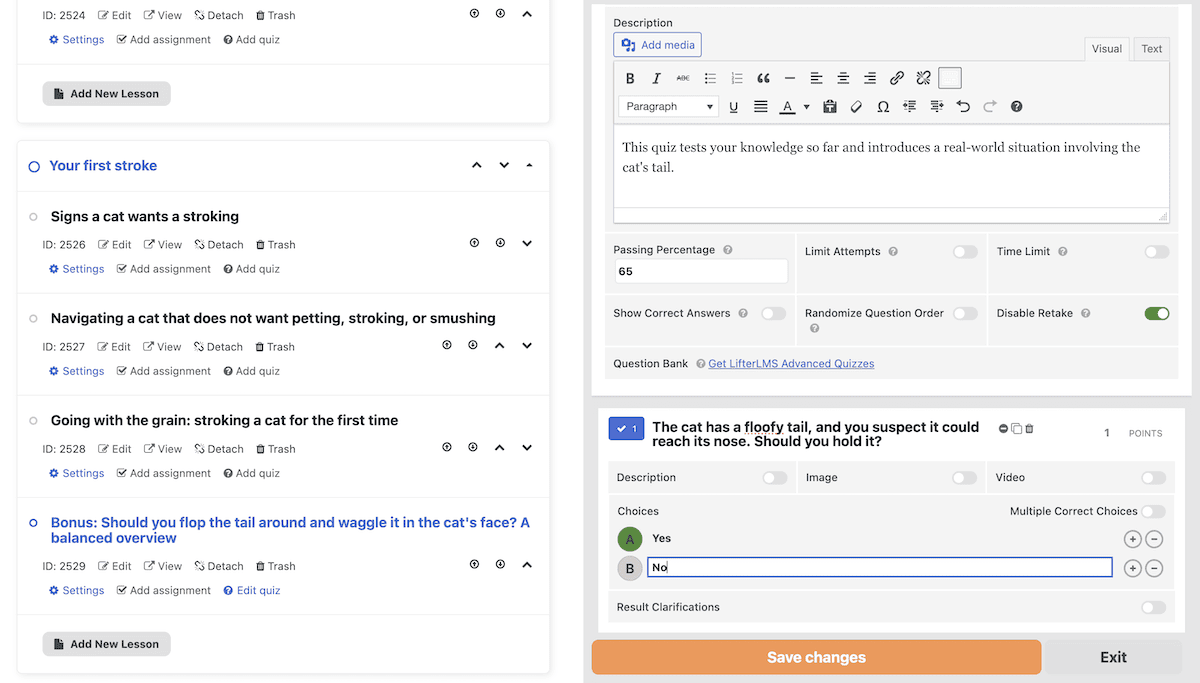
There are a few question types to choose from, which means you can tailor your quizzes for maximum engagement:
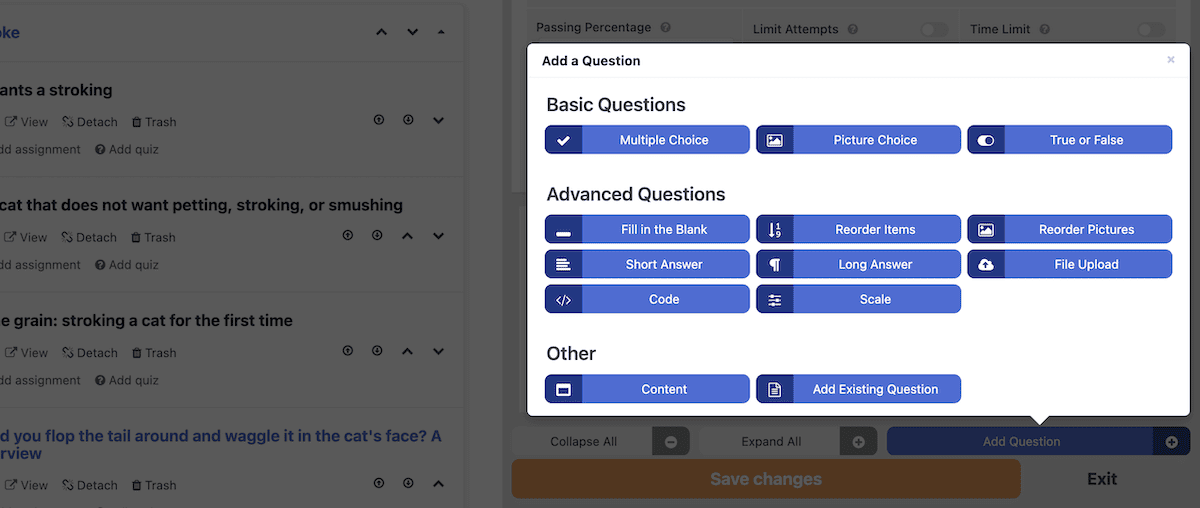
There’s an Advanced Quizzes add-on that gives you greater flexibility in this area, and I think this is almost an essential element for any course. Of course, your lesson’s content is the most important.
Creating a Course: How to Add Lesson Content
There are a few ways to access the core lesson editor: either from the course editor overview, or the pop-out for each lesson:
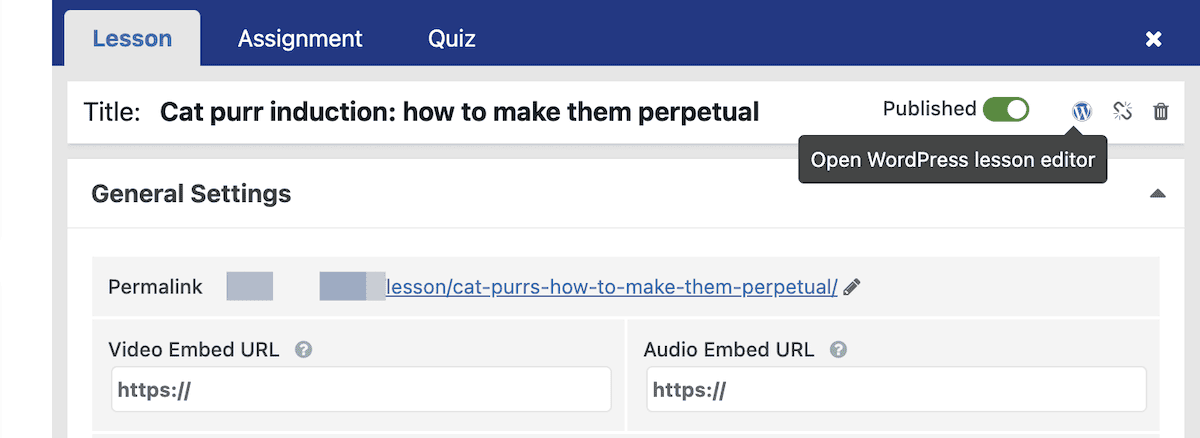
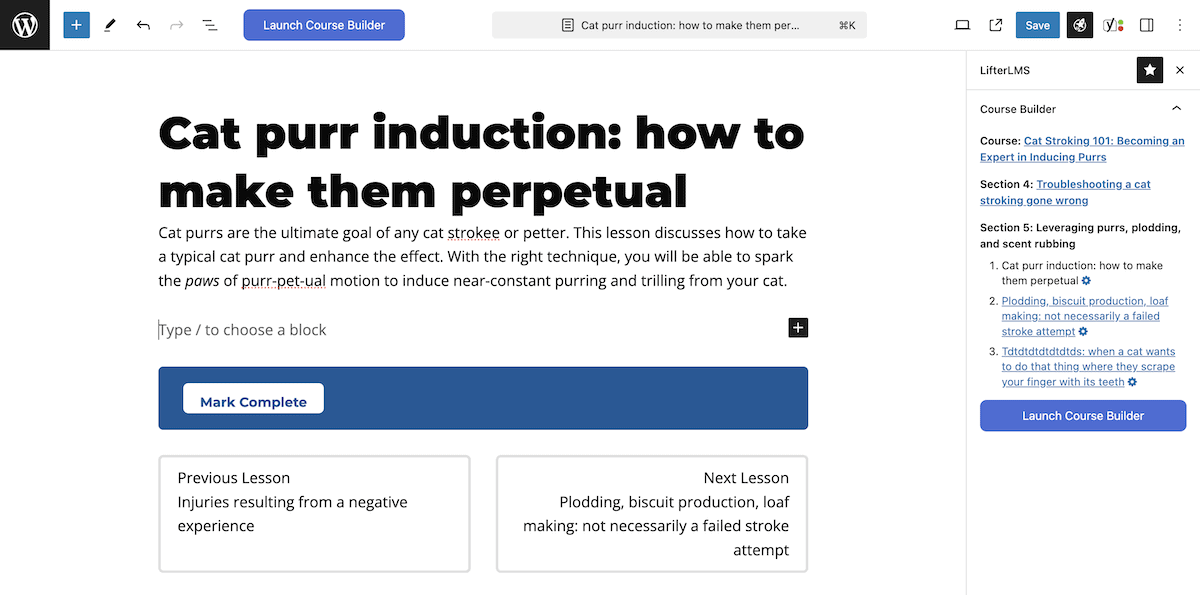
This will bring you back to the Block Editor, where you’ll build your lesson using whatever resources you have:
There are even more options within the Lesson Settings metabox at the bottom of the screen. These let you set prerequisite lessons, make some general changes, and more:
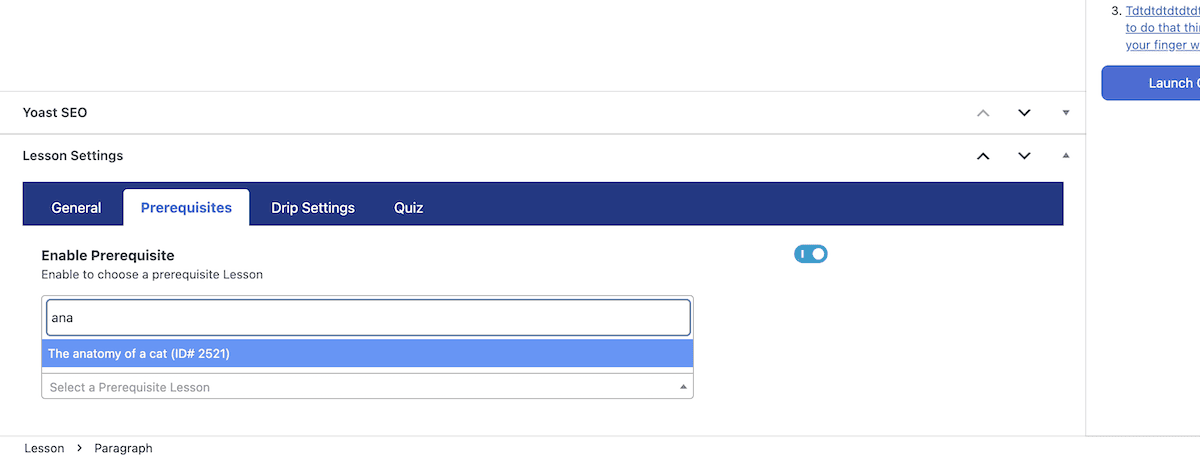
Once you finish here, you can save your changes, publish your lesson, and check it out on the front end. However, I recommend you look at access and payment before you make your lesson live.
💳 LifterLMS Review: Its Built-In Payment Options
It’s likely that you’ll create online courses with the goal of monetization. LifterLMS helps you do that in a number of ways. The primary method is through Access Plans. You can find these in the Course Settings dialog:
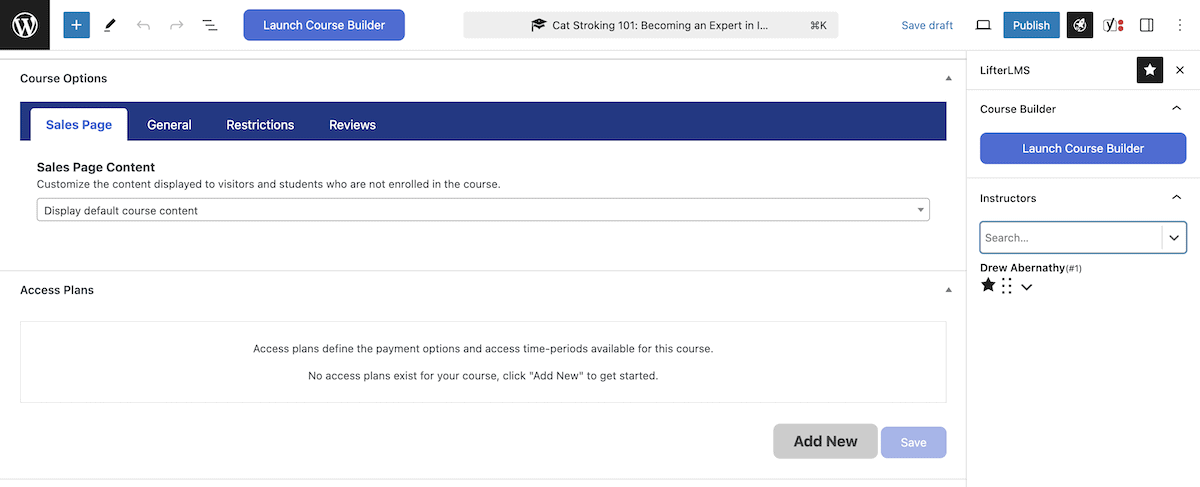
When you add a new access plan here, you have lots of options to customize your payment terms:
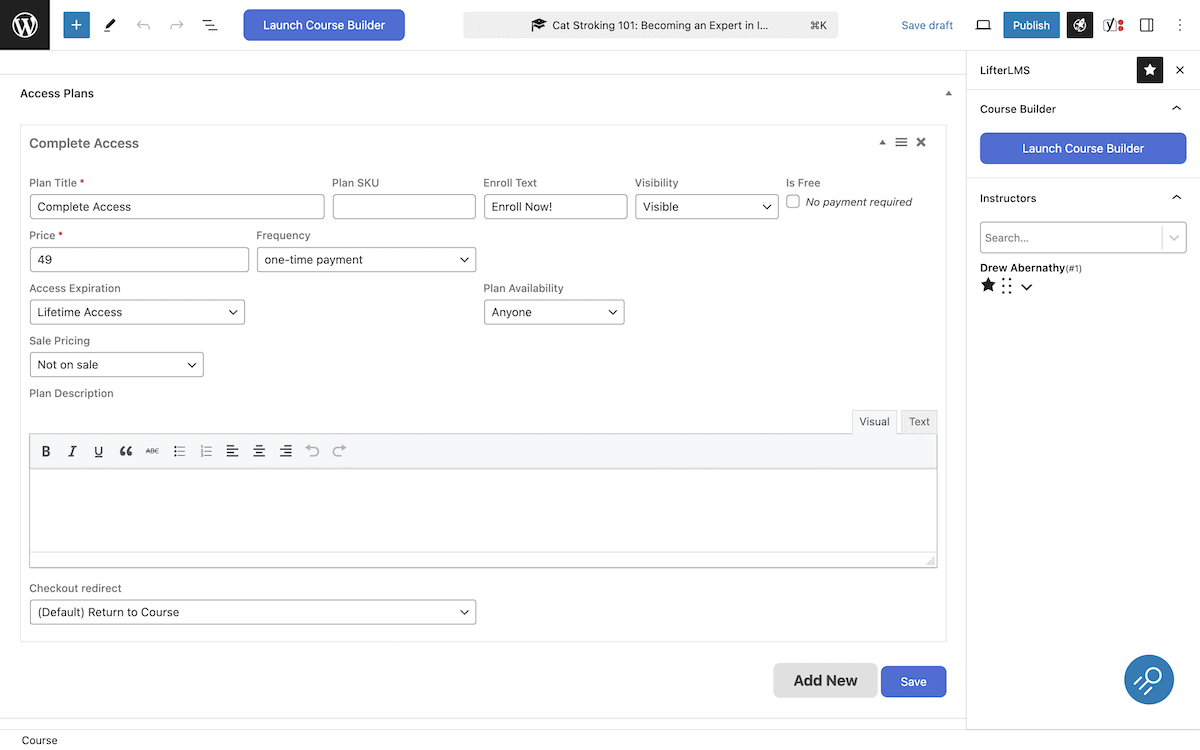
In a nutshell, you can set a course up as free, offering a one-time payment, or charge a recurring payment. You can also set expiration dates for the course, such as whether the cost gives you lifetime access.
However, you can create multiple access plans for a single course. This gives you a lot of pricing flexibility, to help all potential students enroll. For instance, you can offer a monthly subscription, an annual plan, and a lifetime access option. I like the idea of a few different offerings here:
- You could sell memberships to a course for a limited time, or provide access to multiple courses in a bundle.
- With the Course Cohorts add-on, you could offer a group discount for several students learning together.
- The Private Areas add-on could let you upsell private coaching for those who wish to advance and enhance their learning.
There are other ways to monetize your courses, such as with coupons. However, most need further add-ons. I’d encourage you to look at the full list and see what scope you have available.
💰 LifterLMS Review: How Much It Costs CUT
The core functionality of LifterLMS is free, and that download from the WordPress Plugin Directory is one you need to undertake to set up your course platform. From there, you build upon that core feature set with premium add-ons.
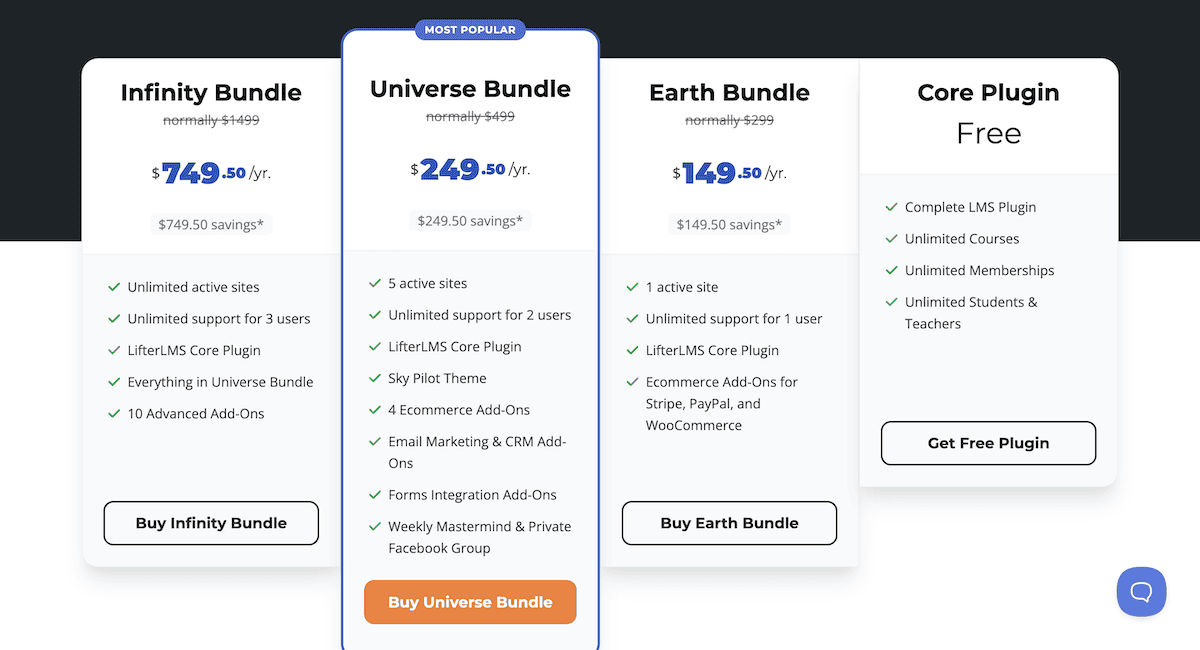
Each add-on has an individual price, but some are astronomical—$300 per year in some cases. In my opinion, there’s no need for an individual add-on unless you really only want the one and everything else is to your liking. Even then, a premium bundle will offer much greater value:
- Earth. A single-site license gives you access to payment processing add-ons for $299 per year.
- Universe. There are some email marketing, forms, and e-commerce add-ons here, along with five licenses. This $499 bundle also gives you access to private social media groups and communities.
- Infinity. For $1499 per year, you have access to everything LifterLMS offers, and can use this functionality on as many sites as you need.
My advice is to choose the Earth Bundle if you simply need to accept payments on site. This is $299—just as much as a single add-on—although sales are regular. With the WPKube LifterLMS coupon you can save even more. You could even trial the whole experience for 30 days through a $1 payment!
👍👎 The Pros and Cons of LifterLMS
By now, you’ll likely realize I am a fan of LifterLMS. However, it’s important to recognize that no solution is perfect. As such, I want to weigh up the positives and negatives of the WordPress LMS plugin after using it for a while.
👍 Pros
- The drag-and-drop course builder is slick, which makes it simple to set up your courses.
- If you want to use video lessons, LifterLMS is one of the best options available.
- I like the flexible ways for students to pay, especially the payment plan options.
- The front-end experience for students is arguably one of the best in the space.
👎 Cons
- LifterLMS can be expensive if you need multiple add-ons and don’t want to purchase a bundle. Even so, the higher-tier bundles are expensive too in comparison to plugins such as LearnDash.
- I found the initial setup to be confusing, despite the wealth of support and documentation. I’d like to see a clearer onboarding process for users of all levels.
🏁 LifterLMS Review: My Thoughts on This WordPress LMS Plugin
I think I have my new favorite WordPress LMS plugin! LifterLMS made sense to me in a number of areas. Its course and lesson builders were straightforward to use, the payment options for students are thoughtful, and the add-on selection is excellent.
The core plugin has enough functionality for most online courses in my opinion. It could be everything you need. For paid courses though, you do need to consider which premium plan is right for you. A LifterLMS coupon could help sway you here, and the Earth plan makes sense for basic courses. It could be a good idea to wait for a regular sale if you want to purchase a higher-tiered plan with a limited budget.
Do you agree with my LifterLMS review? I’d love to hear your thoughts in the comments section below!


Hey Everyone, thanks for this article. I specifically searched for LifterLMS Reviews, and this has helped a lot. I think Chris Badgett at LifterLMS isn’t kidding when he says he knows education inside and out. Just thought I would leave this mark of my appreciation for your content. It helped my decision-making.
BTW your form here is a little wonky. Getting