Displaying a favicon on a WordPress website has become extremely popular, and for good reason. A memorable favicon enables your audience to instantly recognize your site and select it from a full row of tabs in a busy browser. But how do you easily add a favicon to your WordPress website?
In this article, we will look at what exactly a favicon is and why your site should use one. We will then learn how to quickly create a favicon image and upload it to your site using the WordPress Customizer. We will finish by discussing other ways to add a favicon, including various plugins and a coding option.
What is a Favicon?
![]()
Since WordPress 4.3, when it suddenly became extremely simple to add a site icon to a website, the majority of WordPress websites now display a favicon. Favicon is short for ‘favorite icon’, but it can also be seen on the WordPress Customizer under the name of ‘site icon’.
A favicon is the image that is displayed on a browser tab, and as an app icon, to help people recognize a website. If you look up at the top of your page now, to the tabs open in your browser, you will see a row of favicons. These are placed next to each website’s page title.
A site icon usually reflects a website’s brand. Often they will be the same image as a site’s logo. However, they can also be a picture that represents your business in some way. Subconsciously, users will become familiar with a wide assortment of favicons, and will be able to select a site from numerous open tabs, just by recognizing the symbol.
Why You Should Be Using a Favicon
![]()
Using a favicon is a clever marketing ploy. The main aim of a favicon is to help a user to identify your site from its competitors. A favicon visually engages with your audience, reminding them of your site and ensuring they can locate it quickly.
A favicon also helps promote your brand, and establishes your site as a reputable source. The ease of setup, alongside the marketing benefits, should ensure all that all sites add a favicon.
How to Create a Favicon
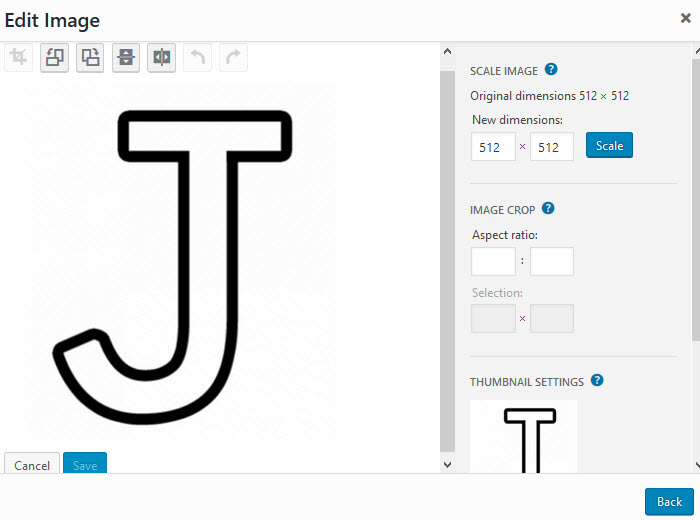
A favicon can be any image, but as already mentioned, it is better if it is either your site logo or is linked to your branding in some way. A simple yet strong and bold icon will make a site stand out and be remembered.
Once you have created or decided on an image, it will need to be edited. A WordPress favicon must be square in shape and be at least 512 x 512 pixels in dimension. Although it can be cropped in WordPress, best practice would be to produce your favicon in an image editing software. GIMP is an easy to use image manipulation program that will help you to quickly edit your image to the right dimensions in minimum time.
You will also need to decide if you want your favicon to have a colored background, or if you would rather transparency. Again, always try to represent your site’s look and style, whilst bearing in mind your icon needs to stand out in a sea of browser tab favicons.
When you are happy with the look of your favicon, it should be saved in either jpeg, png, or gif format. Now you are ready to upload it to WordPress.
How to Easily Add a Favicon to Your WordPress Site
Once you have created and edited your image, adding it as a favicon is a very easy process. This never used to be the case, but thanks to advances with the WordPress Customizer, displaying a site icon is now extremely quick and straightforward.
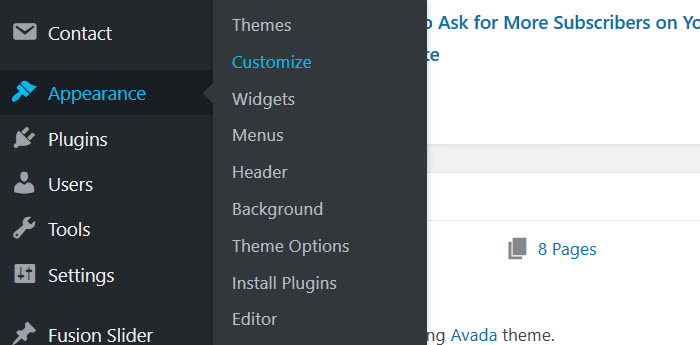
First of all, in your WordPress dashboard, select ‘Appearance > Customize’. This will open the customizer on the live end of your site.
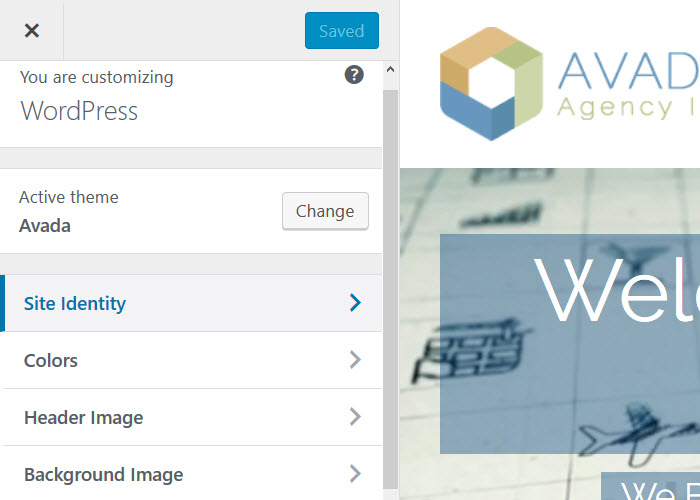
In the customizer, select ‘Site Identity’. It is here you will find the option of adding a site icon.
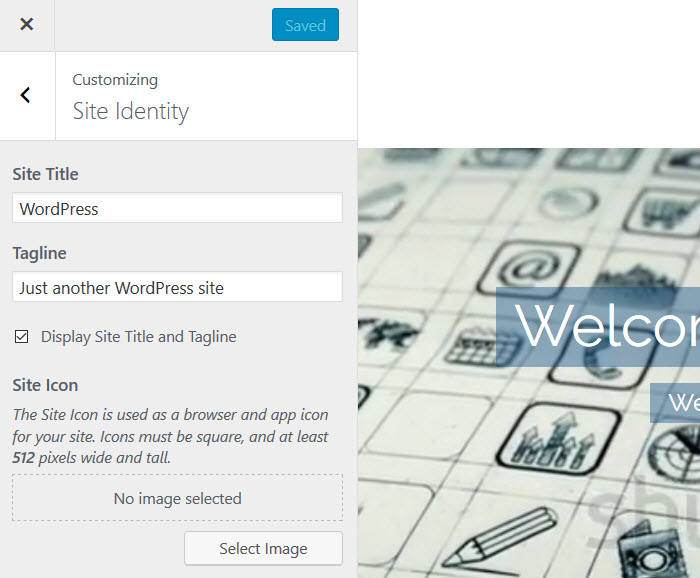
Under ‘Site Icon’ click on ‘Select Image’.
Now your media library will open. This enables you to choose a saved image, or upload a new one. Once you have selected an image, if you need to crop the image to make it the correct size, you can do so here.

Your favicon will now appear under ‘Site Icon’ in your customizer. Remember to always click on ‘Save and Publish’ at the top of the customizer so your favicon will be saved and displayed.
![]()
Your site’s browser should now display your site’s favicon.
![]()
Using a Plugin to Display a Favicon on Your WordPress Site
Of course, as always with WordPress, there are a number of different ways to display a favicon on your site. Aside from the customizer, various plugins are available to help you add a site icon.
If, for some reason, your theme doesn’t provide the option of uploading a site icon through the customizer, or if you are looking to change themes in the not too distant future, then using a WordPress plugin might be the best option for you. Let’s have a look at what plugins are available.
Favicon by RealFaviconGenerator
![]()
Favicon by RealFaviconGenerator is an advanced plugin that ensures your favicon is visible on all browsers and devices. RealFaviconGenerator allows you to check your existing favicon, to see how it appears to your audience if they are viewing it on Android, iOS Safari, Windows or Mac OS, to name a few. This will give you an indication of what your icon looks like and if it is working on all platforms.
![]()
Favicon by RealFaviconGenerator generates all the icons you need for desktop browsers, phones, tablets, and more. Once you have installed the plugin and selected an image from your WordPress Media Library, you will be redirected to the RealFaviconGenerator. Here you have access to the Favicon Editor, where you can alter the design of your favicon and add a background if you wish.
The plugin then automatically uploads your finished favicon and generates all the icons necessary. You can view how your favicon will appear on the various platforms, all from within your WordPress dashboard. Favicon by RealFaviconGenerator is a great option if you need to use a plugin to add a favicon and one that ensures visual consistency across all devices.
All In One Favicon
![]()
All In One Favicon is a popular free WordPress plugin. It will quickly and easily add a favicon to your site, as well as to your admin pages.
This plugin supports ico, png and gif images, as well as Apple Touch icons. It has a built-in upload function. Therefore, you can use a favicon that has already been added to your WordPress Media Library. Alternatively, you can upload a new icon through the plugin interface. All In One Favicon has the potential of saving you time and stress and is a good option for those looking for a straightforward favicon plugin.
Using Code
Before WordPress 4.3, a favicon was commonly added by uploading an image to a site’s root directory and then inserting code into your header.php file. Information on this process can all be found on WordPress.org in the Support section.
Final Thoughts
Creating and adding a favicon to your WordPress site doesn’t have to be a lengthy and confusing process. Edit and crop your favicon in GIMP, or another image editing program, then simply upload it through the WordPress Customizer. If you need to use a WordPress plugin, Favicon by RealFaviconGenerator is the advanced option. It has powerful functionality and impressive ease of use.
Now you know the benefits of using a favicon, how to create one and add it to WordPress. Isn’t it time your site had a favicon of its own?
Have you added a favicon to your site? Please share your experiences of the setup process in the comments below.


Leave a Reply