We often talk about how your users are at the heart of your site. In some cases, this is literal. While your visitors are vital, the users – i.e. those with access to your WordPress dashboard – need management and organization. As such, you have to look at your WordPress user roles and use them in an optimal way.
To do this, WordPress provides a few native features to work with your user roles and profiles. Though, you can also install plugins to help give you more functionality. What’s more, other plugins will add its own user roles to the platform.
For this post, we’re going to look at how to add, manage, and work with WordPress user roles. First, we’re going to chat about how collaborative WordPress is as a platform.
The Collaborative Power of WordPress
It may seem a distant situation while you’re sitting at home updating your WordPress plugins and managing your spam folder, but WordPress is great for collaboration. The nature of the platform means anyone you specify can jump into the dashboard and work on content, design, or something else.
The way this happens is though dedicated user roles. Under the hood, WordPress almost ‘splits’ access to the platform, much like any other permissions-based system. Through its default installation, you can set a number of general permissions, that act as a profile for that user.
We’ll get onto what makes up a user profile in a while, but suffice to say, it’s a flexible system out of the box. In lots of cases, you won’t need to deviate from the core functionality.
Why Creating WordPress User Roles Benefits Everyone
To understand why user profiles and permissions are a key aspect of WordPress, it’s important to think about how the experience would be otherwise. In other words, consider WordPress without permissions.
The whole landscape of how we use WordPress and the web would change, for both end users and site owners. For starters, everyone given the permissions to work on the site’s content would have full reign over every aspect on the site. This could be disastrous for many reasons:
- A new team member could make a ‘mission critical’ mistake that takes content offline, or worse, the entire site.
- Old team members could deliver one last “Goodbye”, especially if they want to be malicious. This could also take down your entire site, and lead to some major ramifications.
- Visitors to your site wouldn’t have the ability to sign up for your website’s products and services without some third-party trickery. This is a big deal, because WordPress user roles affect the client-side of your site too.
On the whole, roles and permissions help ‘contain’ users to the areas they need to be. They are the velvet rope of WordPress, and in the same way, the functionality is basic in its implementation.
How to Create New WordPress Users
The primary place to work with users is within the WordPress dashboard, through the Users menu:
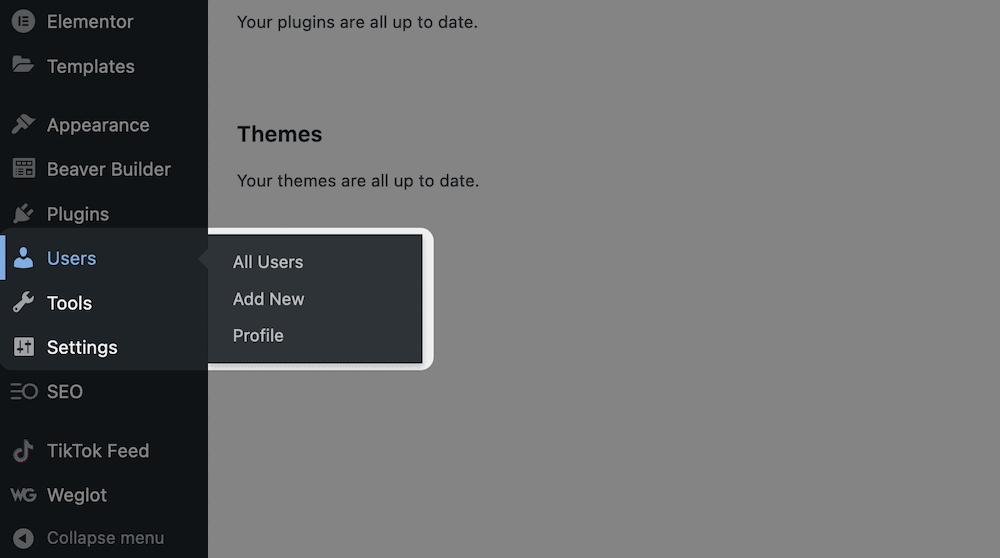
We’ll talk about these options later, but the Add New link does what it says on the tin:
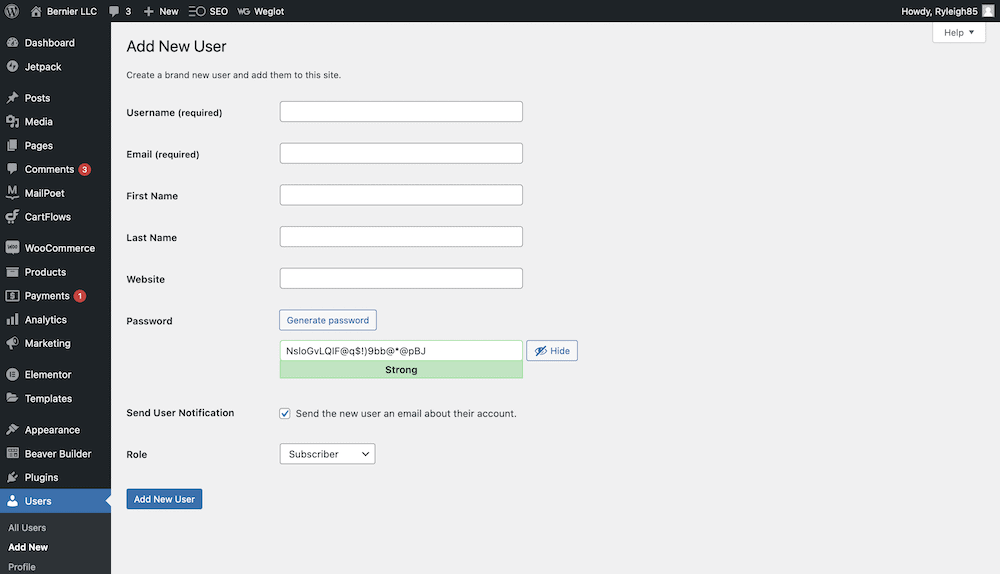
You’ll note only two required fields: the Username and Email sections. Though, you also get the ability to fill in a First Name, Last Name, and Website too. These are relevant in a number of cases, but will see the most use if the user will have a public-facing profile.
The Password textbox will auto-generate for every new user, and you can regenerate it using the Generate password button:

There’s a nice User Experience (UX) measure here, in that you get an indication of your password strength too.
If you would like to send the user a notification once the new account is active, you can leave the box checked here. In most cases you’ll want to do this, but there are a few cases where you wouldn’t. For example, if you create users before a team member arrives with you, this might not be necessary.
Regardless, what is necessary is choosing a WordPress user role. Let’s look at this in more detail.
The Default WordPress User Roles
The whole point of user profiles is to give you an opportunity to set relevant permissions. In other areas, such as Secure File Transfer Protocol (SFTP), you do this through read-write permissions, and a three-digit identifier.
For WordPress, the process is more ‘human-readable’. There are six default WordPress user roles to choose from, ordered here from least capabilities to most:
- Subscriber. This role is the least permissive. A Subscriber can manage their profile and read the posts on the site. Other than that, there are no other advantages.
- Contributor. The main permission here is that a Contributor can create posts. Though, publishing and deleting a post is outside of the scope. A Contributor can delete a draft, but that’s all.
- Author. The role is more individual, in that you can’t work with other content on the site other than your own. An Author can create, edit, publish, and delete posts, add media such as images, and add taxonomies. Though, an Author can’t create new categories, only add existing ones.
- Editor. This role handles content and related aspects, such as comments. It lets a user publish, modify, and delete any post or page on a site, moderate comments, and manage taxonomies.
- Administrator. If you create a site, or are the first user of the site, you’re the Administrator. You get the most permissions, and can do anything you wish without restriction.
- Super Admin. If you run WordPress Multisite, a Super Admin is responsible for the entire network, as opposed to one site only. You won’t see this user role if a WordPress sit isn’t part of a network.
You may see other user roles in the list. This depends on whether you have created custom roles, or install plugins that add new roles to select. We’ll have more on both of these later.
How to Manage WordPress User Roles
Managing your WordPress users happens on the Users > All Users screen. It’s simply a list of the current users on your site:
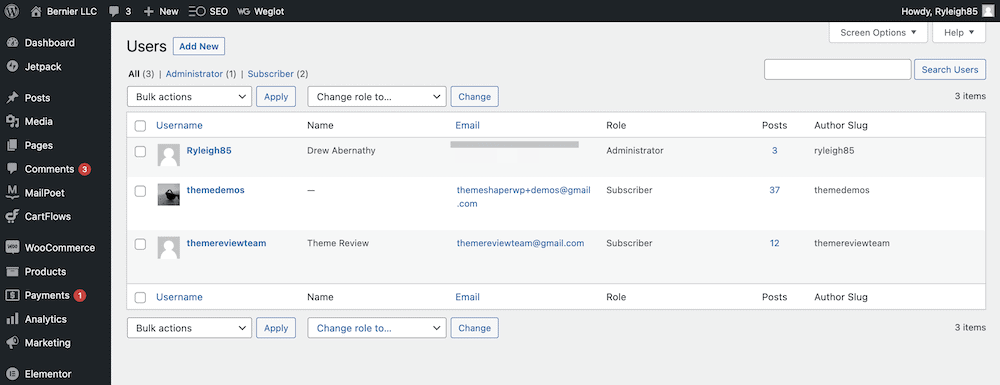
Along the top of the screen, you can a filter with a breakdown of the different user roles on your site. Below this, there are a couple of drop-down menus to help manage your users. The options here are scant, but essential:
- You can bulk delete users, and send a password reset link.
- You’re also also to bulk amend roles for users too.
Though, if you hover over a user and click the Edit link, as an Administrator you get access to their entire profile:
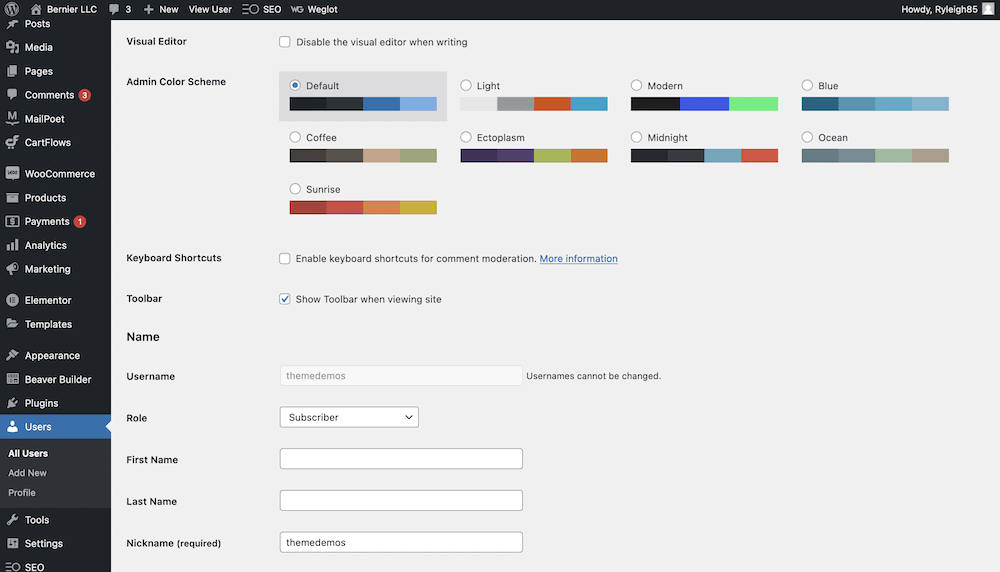
This screen is similar to what a user would see when they access the profile. There are options to amend the color scheme, add personal information, change contact information, and add a bio and Gravatar image. Though, there are a few other specific sections that can help you manage the user profile:
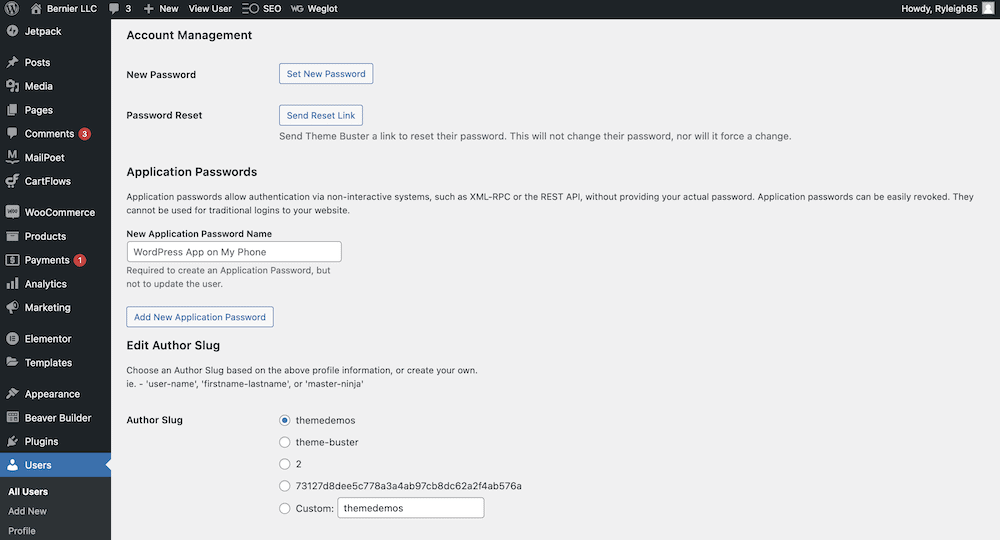
For starters, there are links to send or reset user passwords. You can also add Application Passwords, for user with the REST API to offer authentication without the need for the user password. You can also edit the author slug for the user. This is relevant for archive pages and other URLs.
Depending on your other plugins, there could be more information here. For example, WooCommerce includes customer billing information, as this is relevant on a per user basis:
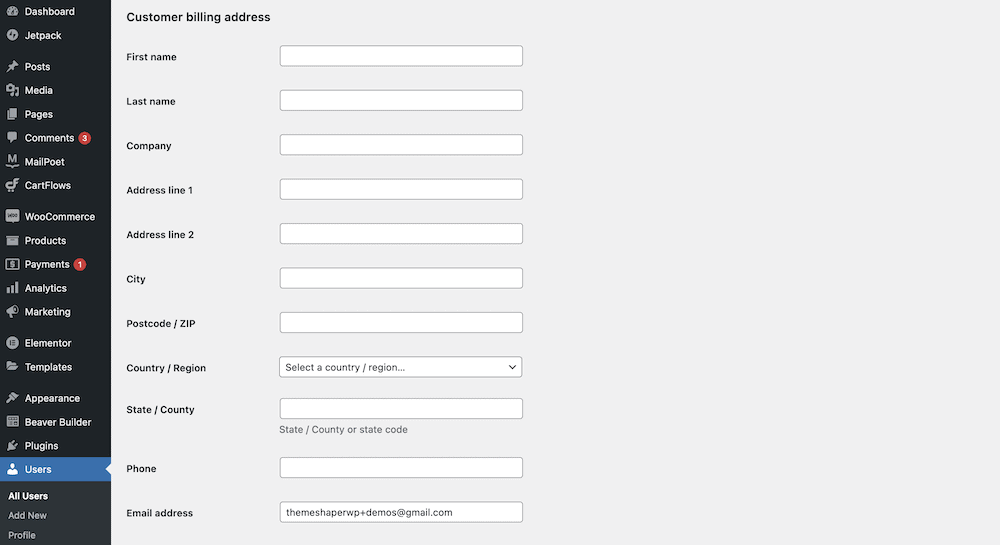
Of course, anything necessary for the user will be within a profile, and it should be the first place you go to work with user information.
How to Manage New WordPress User Roles Using Plugins
WordPress also lets you use plugins to bolster the functionality of your user roles. The classic plugin that many site owners use is User Role Editor:

You’ll find the settings under Users > User Role Editor within WordPress:

On this page, you’ll see a bunch of what look like WordPress functions. In fact, these are functions related to every action a user can take on your site:
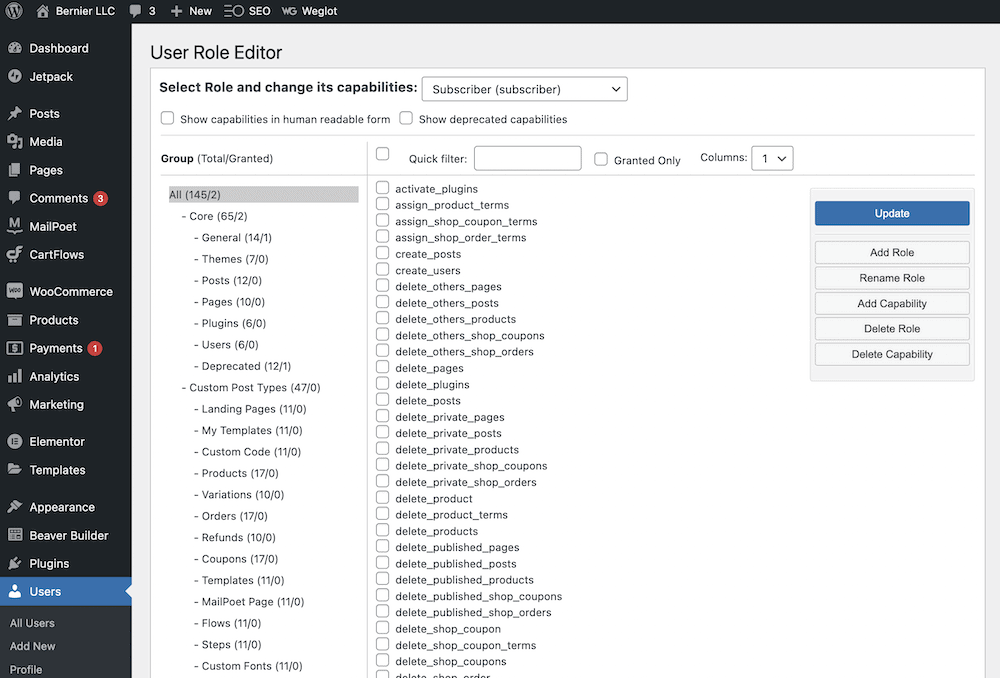
As you might expect, you get the ability to set defined and explicit permissions for individual WordPress user roles. You select the role from the top drop-down menu, then choose the permissions group from the left-hand tree menu. Once you check the boxes for your desired actions, click the blue Update button.
There are other plugins to help you achieve the same outcome, such as Members…

…and PublishPress Capabilities:

As such, it’s a good idea to test out various plugins you like the look of. Each will perform in a different way, but the general outcome – direct control over your WordPress user roles – is the same.
Custom WordPress User Roles
So far, we’ve discussed the stock WordPress user roles and amending them to your liking. Though, you can also add new user roles to your site, and in some cases, other plugins will add them. For example, WooCommerce adds Customer and Shop Manager roles – vital for an e-commerce store.
In these cases, the process is straightforward: assign the roles where necessary and go about your day. Though, when you add in a dedicated plugin such as those we mentioned earlier, you can supercharge the functionality.
For example, a Customer is almost redundant, because it has the same permissions as a Subscriber. In other words, a Customer can only read according to User Role Editor:
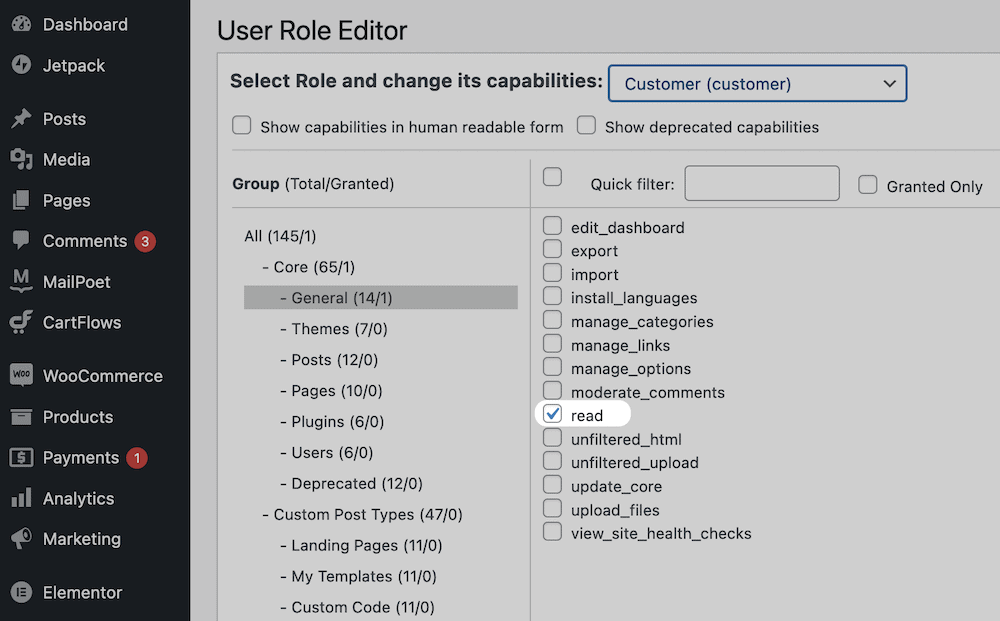
Though, you can give a Customer more permissions if it suits your site. It’s a similar case with the Shop Manager. Consider the default permissions for working with posts:
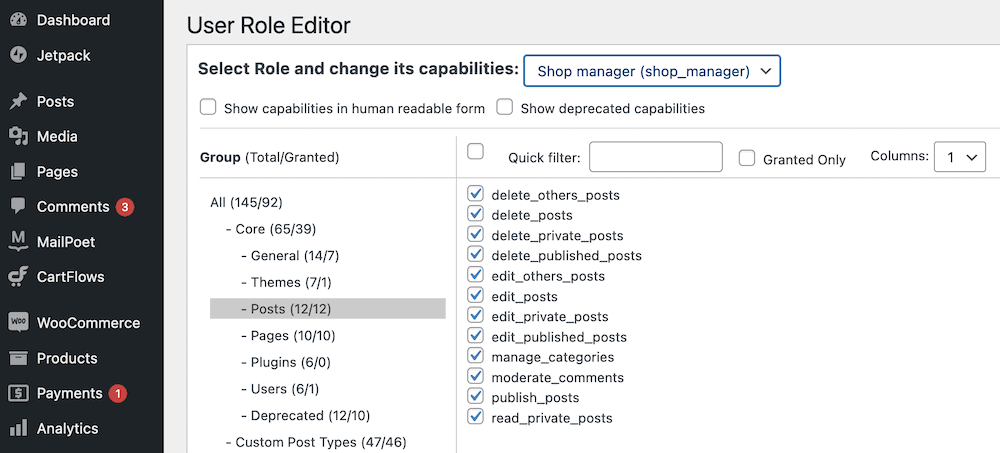
It could be that you don’t want this role to moderate comments or publish posts, only arrange content. While you can take the permissions away, there’s another side of the equation – who will take on those tasks instead? For this, you need a new custom WordPress user role.
Adding New User Roles
The good news is that most of the dedicated plugins will let you create new roles and assign permissions. For example, User Role Editor has the Add Role button:

This lets you choose a new role name and ID. In most cases, you’ll use the same name, but the ID should use underscores for spaces and be in lowercase (much like a WordPress function). You can also copy an existing role to use as a starting point:
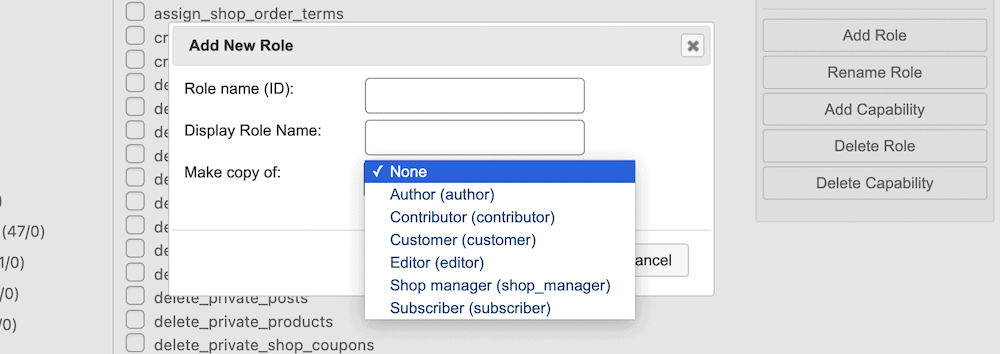
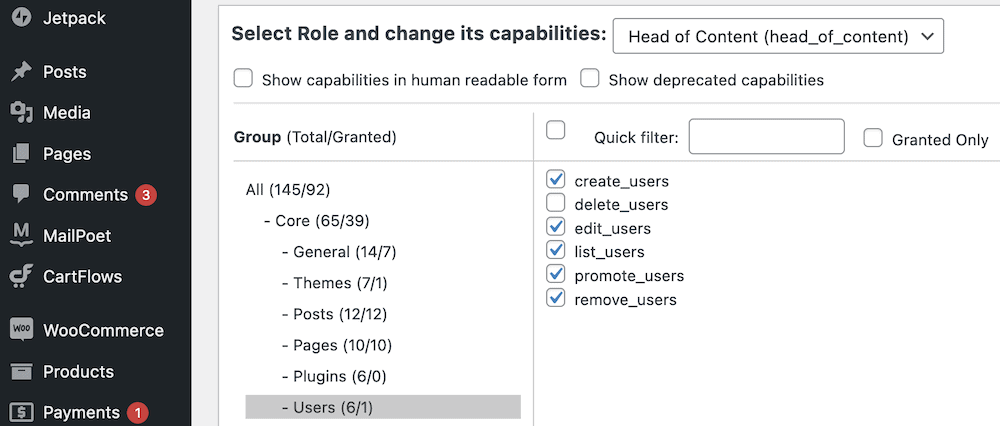
From here, you can use the Shop Manager role as a starting point, and add more capabilities. For example, you could let a Head of Content handle publishing posts, creating landing pages, and manage users. If you remove them from the Shop Manager role, each one is more defined without stepping on each other’s toes.
It’s also worth pointing out that you can change how the capabilities display within the list. If you check the Show capabilities in human readable form box, the list will make more sense to those without having to parse a host of functions:
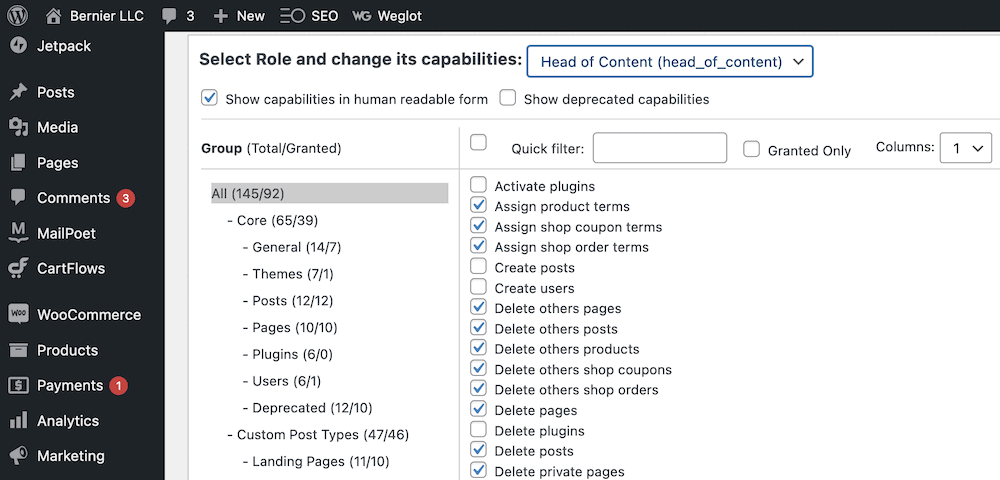
This sort of functionality helps you to create a team and user hierarchy that suits your site and goals. It’s a fantastic feature of WordPress that goes some way to making your whole site’s experience unique, productive, and efficient.
Summing Up
Every part of your site has to focus on your users. Because of this, you can work with dedicated WordPress user roles to give others the permissions and capabilities necessary for how they use your site. For example, a customer won’t need much more than access to a profile page. In contrast, a store manager may need to work with posts and pages, handle comments moderation, and much more.
By default, WordPress offers lots of functionality out of the box, but doesn’t let you create new roles and add capabilities. A plugin such as User Role Editor, Members, or PublishPress Capabilities will let you work with WordPress user roles closer than the native options will allow for. As such, it’s another way that WordPress offers flexibility, and for you to customize the experience based on your users.
Do you use WordPress user roles in a complex way, or would you like to? If so, share your thoughts with us in the comments section below!


Leave a Reply