Considering using Beaver Themer to design your entire WordPress theme with Beaver Builder’s visual drag-and-drop builder?
When we originally wrote this Beaver Themer review back in 2017, the Beaver Builder team was one of the first page builders to move into the full theme building space. The release of Beaver Themer was new and fresh and pushing the envelope.
Since then, however, virtually every other page builder has gotten into the theme building space. Elementor Pro has full theme building, Divi added theme building in version 4.0, Brizy Pro has theme building, etc.
So – does Beaver Themer still stand up in December 2020 when we’re completely updating this review? And more importantly, should you use Beaver Themer to design your website?
Keep reading our hands-on Beaver Themer review to find out…
What Is Beaver Themer?
In a nutshell, Beaver Themer lets you take Beaver Builder’s visual drag-and-drop builder and apply it to your theme templates. Essentially, this lets you design your entire theme using the familiar Beaver Builder interface.
Here’s a quick explanation of how Beaver Themer is different from Beaver Builder:
- Beaver Builder – you can create the design for a single blog post.
- Beaver Themer – you can create the template that all your blog posts automatically use.
Beaver Themer lets you create the templates for all the various parts of your theme including:
- Header
- Footer
- Single templates (e.g. a single blog post, page, or custom post type)
- Archive templates (e.g. the page that lists all of your blog posts or another post type)
- WooCommerce products
- 404 page
- Etc.
You can either display these templates sitewide. Or, for more control, you can conditionally display them. For example, you could use one template for blog posts in one category and a different template for those in another.
How Beaver Themer Works
In this section, I’ll show you roughly how Beaver Themer works so that you know what’s happening. Then, I’ll single out some of the most useful features in Beaver Themer in the next section.
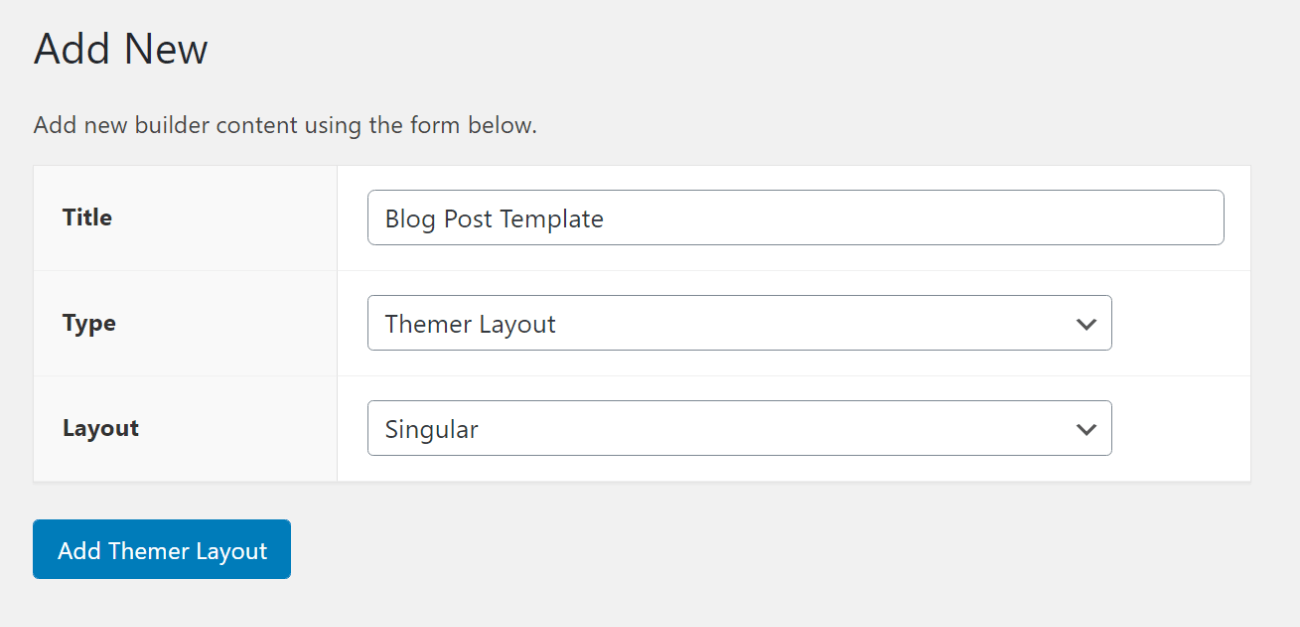
1. Create a New Themer Layout
To get started, you’ll create a new Themer Layout and choose what type of template to create. For example, to create a blog post template, you’d choose Singular. Or, if you want to create a template for your header, you’d choose Header.
2. Configure Layout Settings
Next, you can choose where/when to use this template, which is one of Beaver Themer’s strong points in comparison to other tools.
You have two types of options:
- Location – choose the type of content. For example, all blog posts or blog posts in a certain category.
- Rules – add additional requirements, such as only applying to logged-in users, certain user roles, certain authors, etc.
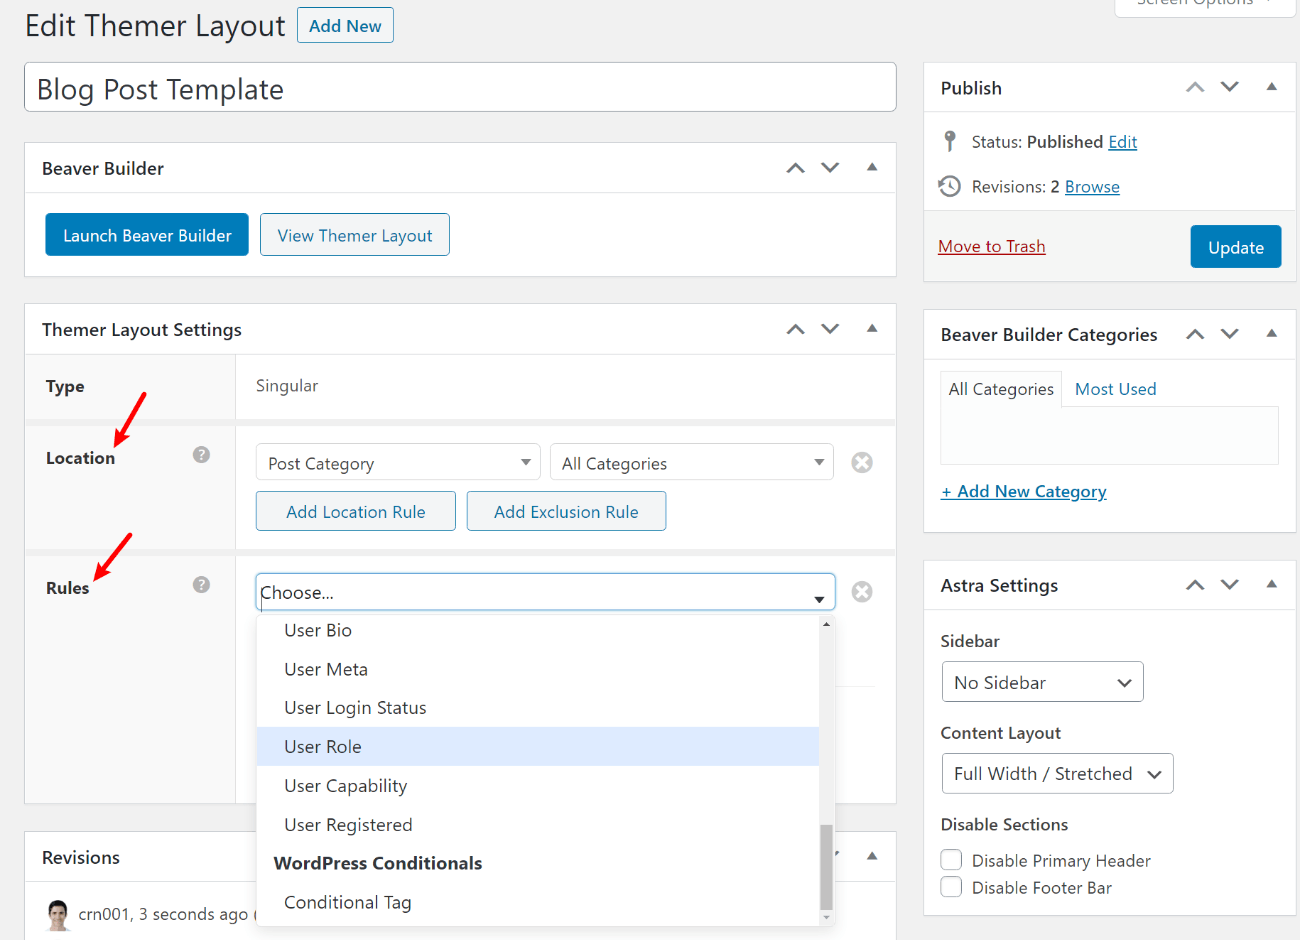
I’ll dig into this in more depth later, but suffice it to say that these settings give you a lot of flexibility.
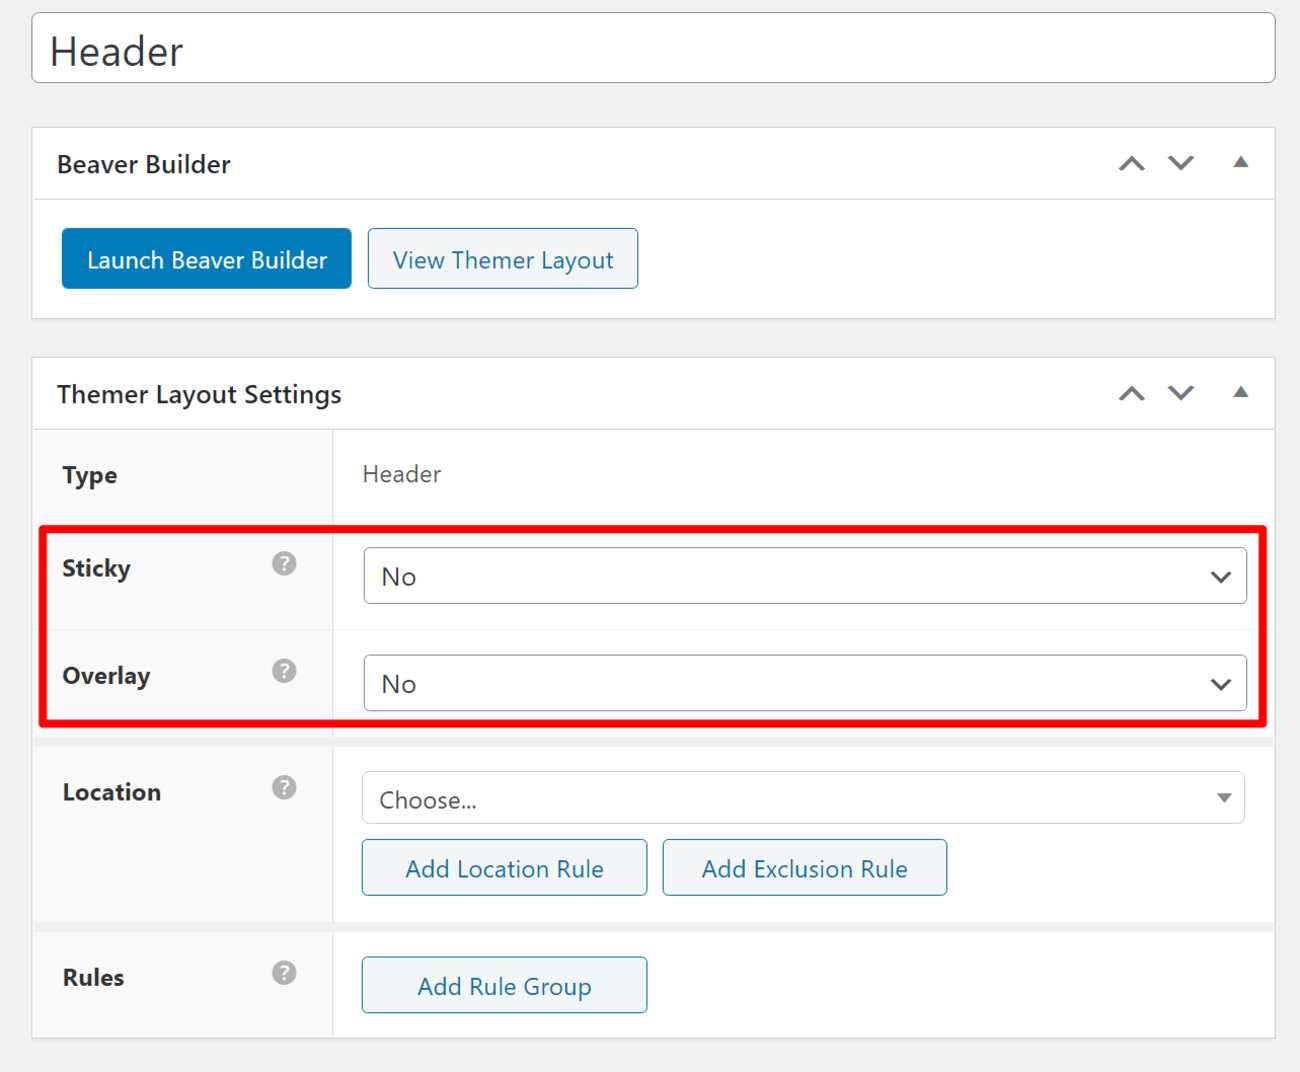
For some template parts, you’ll get additional options. For example, if you’re creating a header, you have the option to make it sticky or an overlay:
3. Design Your Layout
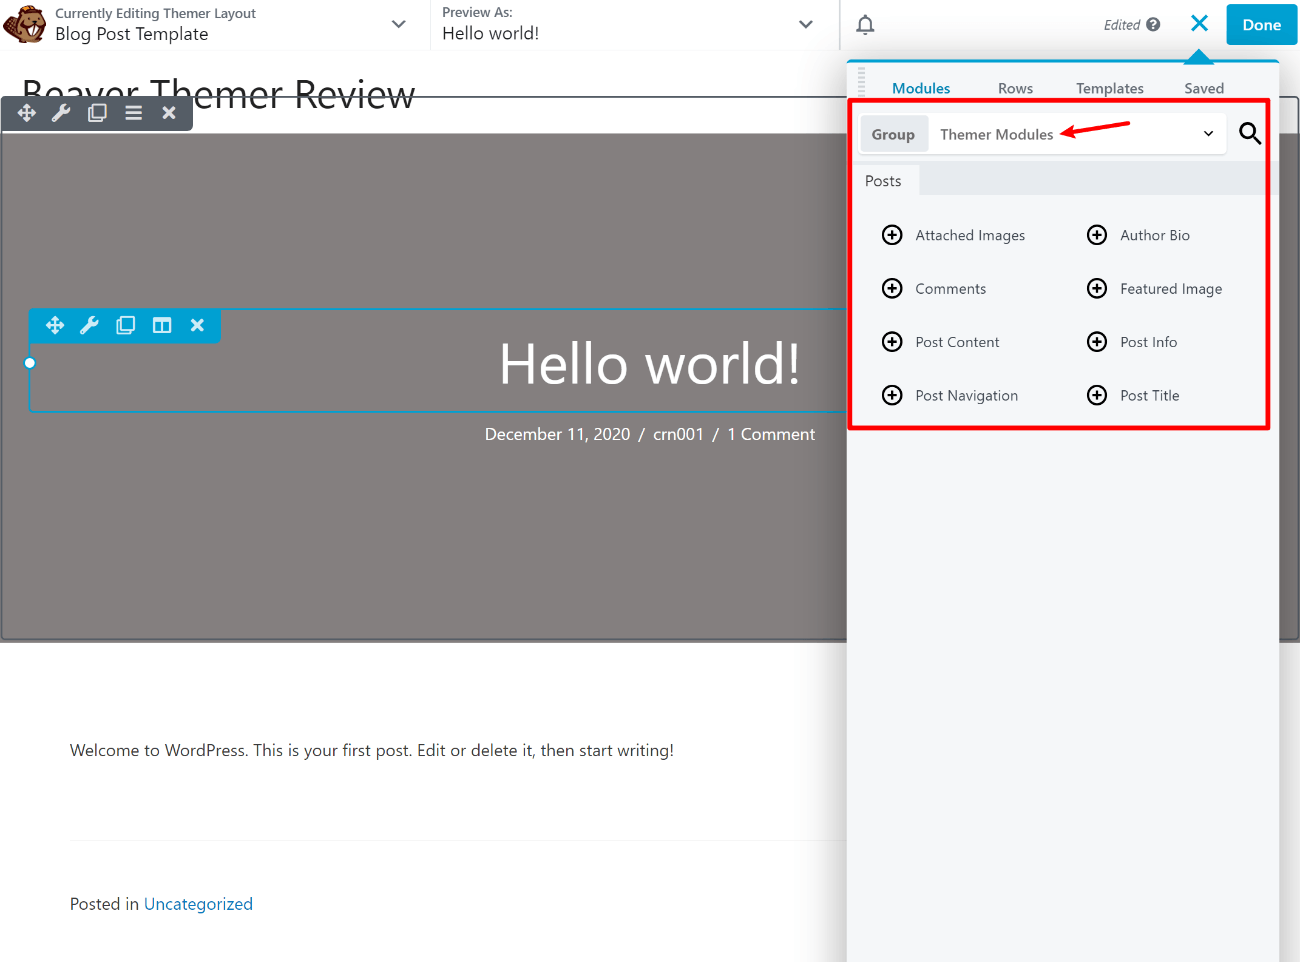
Once you’ve made your choices, you can click the button to launch the visual, drag-and-drop interface. This interface is identical to the regular Beaver Builder interface, but with some extra features.
To help you design your template, you’ll get a new set of Themer Modules to insert content that’s relevant to your template. For example, if you’re creating a blog post template, you’ll get modules for elements like:
- Post title
- Post content
- Author bio
- Comments section
- Etc.
For other types of templates, you might also get modules for navigation menus, site logos, etc.
You can use the Preview As drop-down at the top to choose an example blog post to populate those modules. For example, the “Hello world!” post.
Other than that, everything else is pretty much exactly the same as the regular Beaver Builder interface:
Three Most Powerful Features in Beaver Themer
Ok, now that you know roughly what’s happening, let’s single out three of the strongest features in Beaver Themer to help you understand where it really excels.
1. Detailed Display/Targeting Rules
As I mentioned above, one of Beaver Themer’s strongest features is how much control you get over where your individual templates display and who sees them.
Most other theme builders nail the where part, but Beaver Themer goes above and beyond when it comes to the who. This can come in especially handy for sites where you allow public registration (like a WooCommerce store or membership site).
For example, you could use one template for paying members, another template for free members, and a third template for anonymous guests. This helps you create optimized experiences for each type of visitor, like customizing the header based on the type of user.
You also get options that go beyond even user role or logged-in status. You can target templates by super niche details like:
- Number of comments
- Author logged-in status
- Author information (e.g. different templates for staff writers vs guest posters)
- Post featured image (e.g. different templates for whether or not the post has a featured image)
- Specific usernames
- User meta
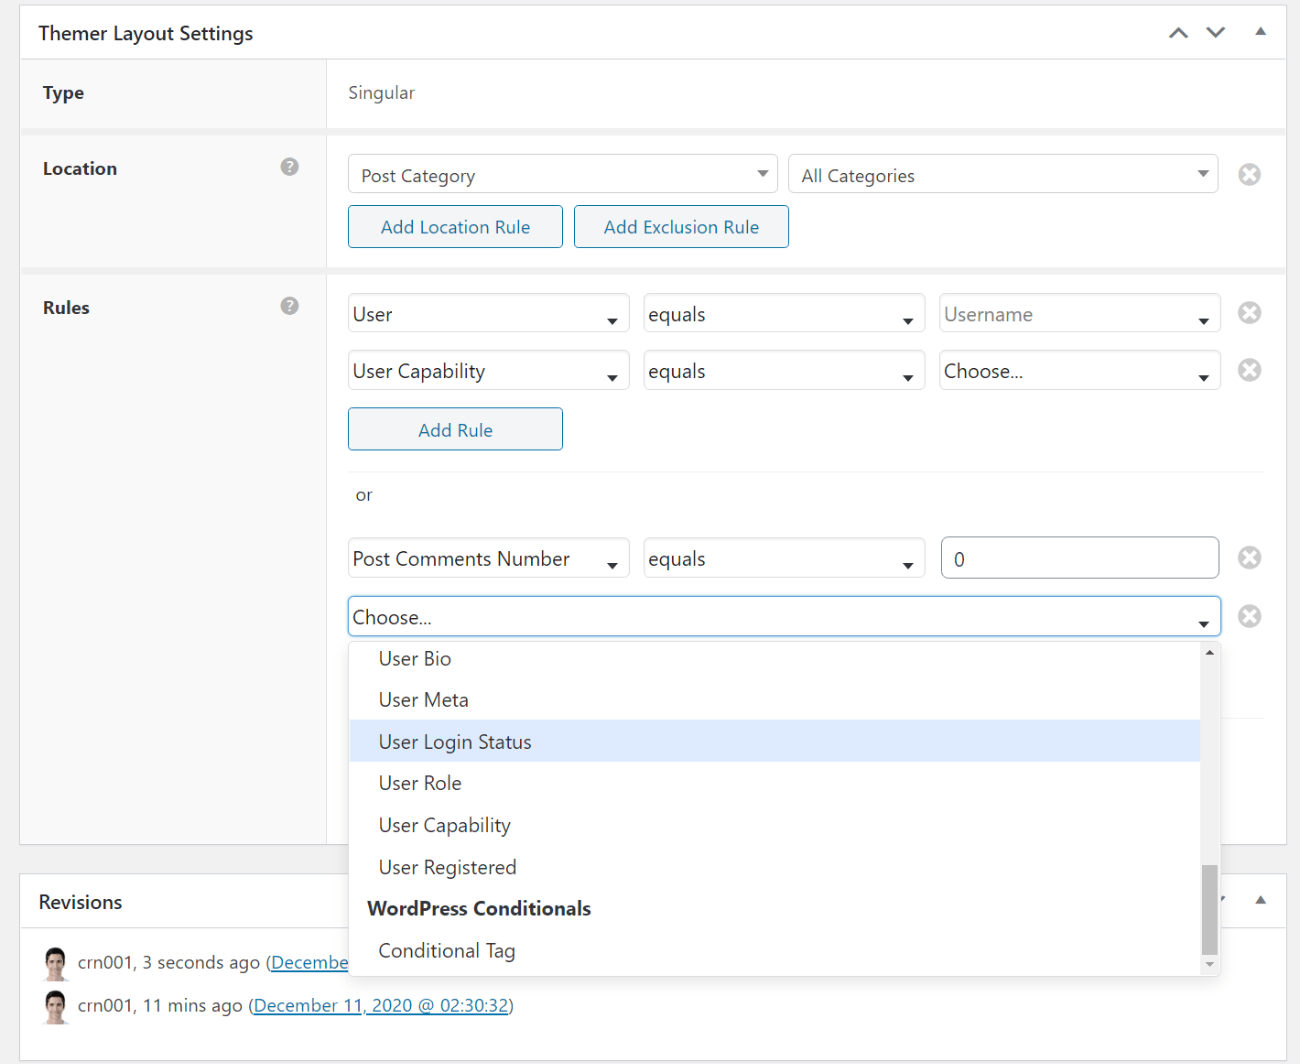
Want to create a special template for posts with high comment engagement? You can do that with Beaver Themer, and I’m not sure of any other theme builder that gives you that level of control.
Overall, Beaver Themer just generally goes above and beyond when it comes to giving you control over when your site uses each template.
2. Dynamic Field Connections (Incl. Custom Fields)
Earlier, I showed you the Themer Modules, which help you insert dynamic content in your templates (like the title of a blog post).
However, you can also go beyond those built-in widgets and also add your own dynamic field connections to regular modules. For example, you could add a regular Text Editor widget and populate it with the post’s last modified date:
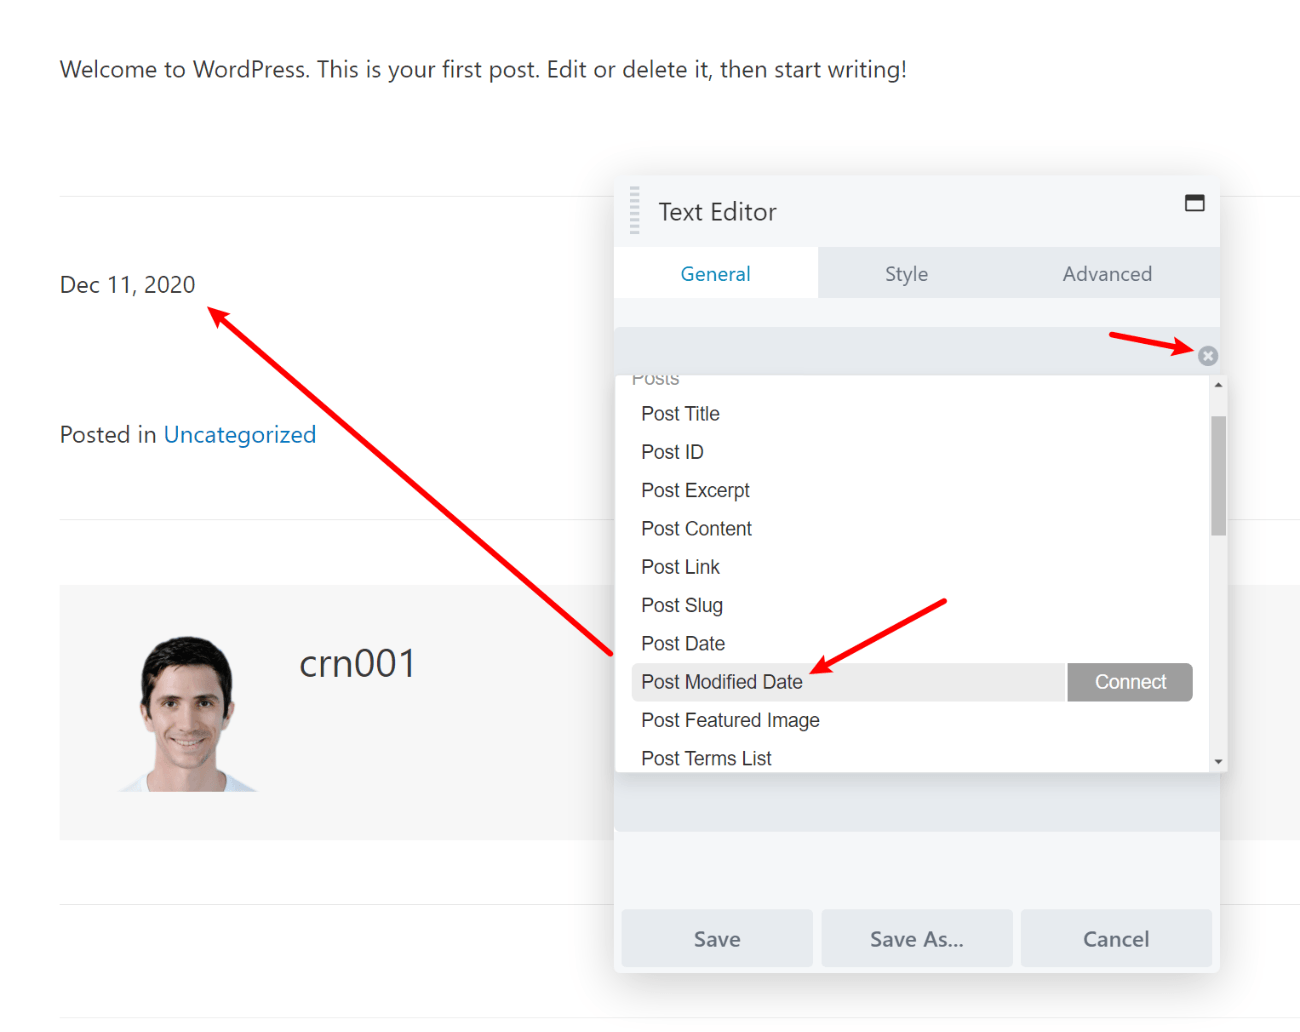
You can hook into pretty much any built-in information, including things like user bio, user meta, current year, author bio, etc. But the really powerful thing here is that you can also include information from custom fields that you’ve added with plugins like Advanced Custom Fields (ACF), Pods, Toolset, etc.
For example, I could create a “Review Summary” custom field with ACF and then display that content right in the Beaver Themer template:
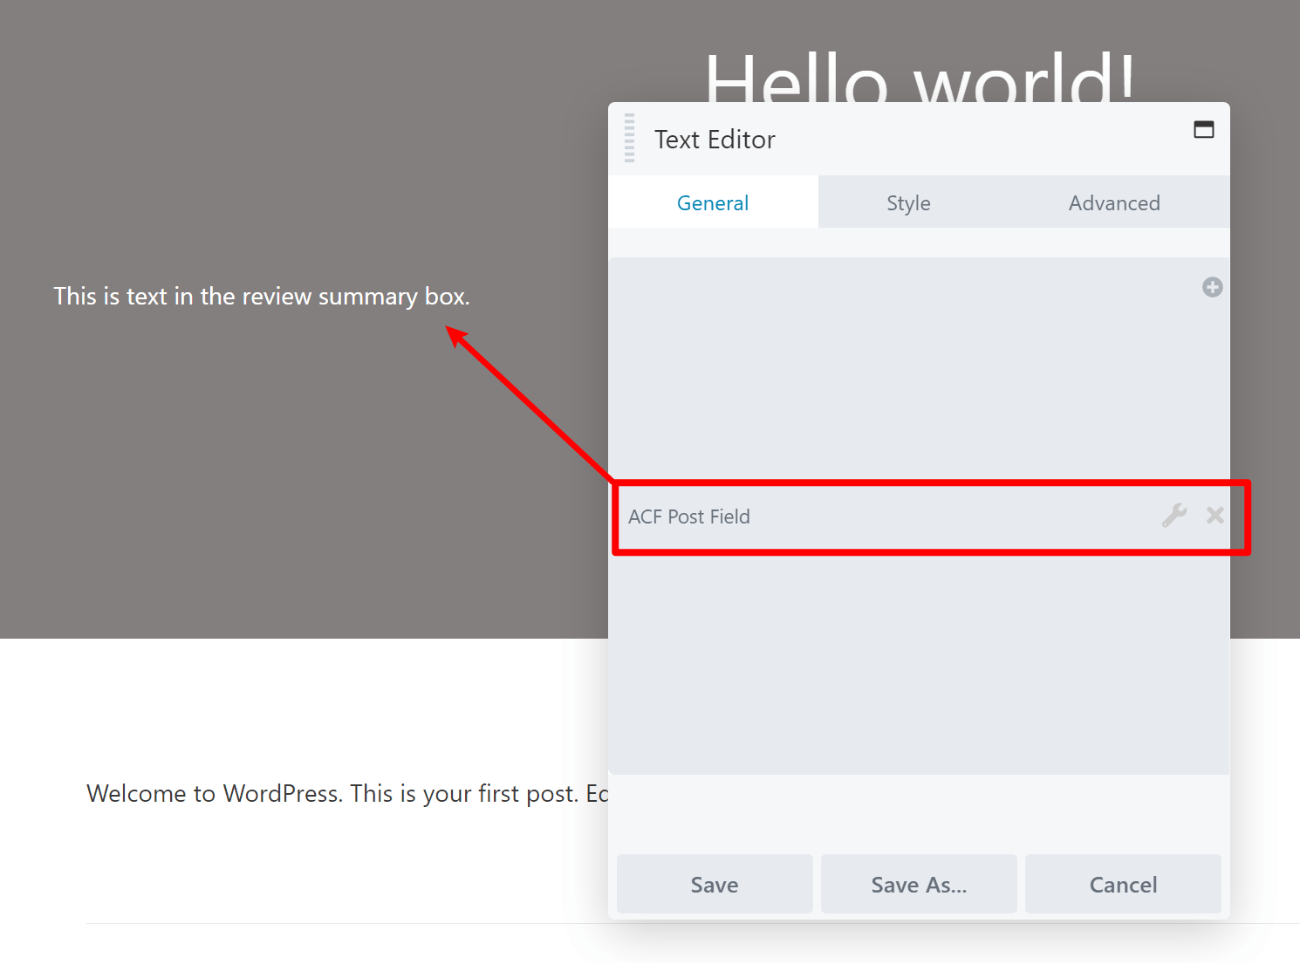
This isn’t just for text content either. For example, you could create a custom field for numbers and then use that number to set the number in a Number Counter module. In general, you’ll see a little “plus” icon next to any field that you can dynamically populate:
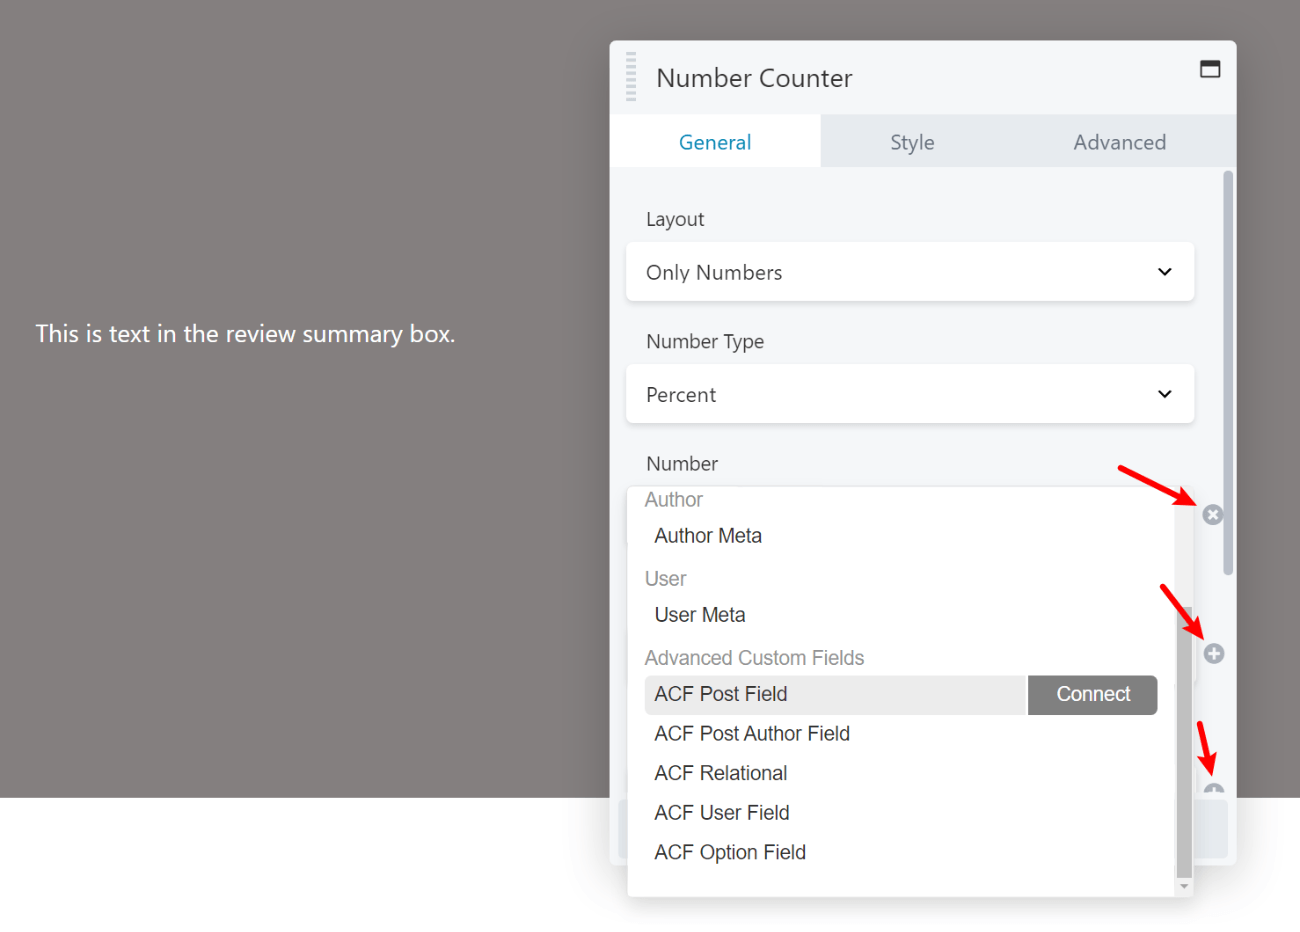
While working with custom fields is definitely an advanced tactic, it really unlocks the power of WordPress as a CMS and Beaver Themer lets you do everything with zero code required.
3. Custom Theme Parts
Beaver Themer lets you create templates for all of your theme’s important parts:
- Header
- Footer
- Single
- Archive
- 404 Page
But another advanced option is the ability to create theme parts.
Theme parts let you inject “mini templates” at various parts of your site, which are super useful for including ads, promotions, lead gen forms, etc. If you’re a developer, this function kind of works like WordPress theme hooks.
For example, you could create a theme part for a review summary box. You could then inject this theme part where you want it to appear, like at the beginning or end of blog posts in the “Review” category:
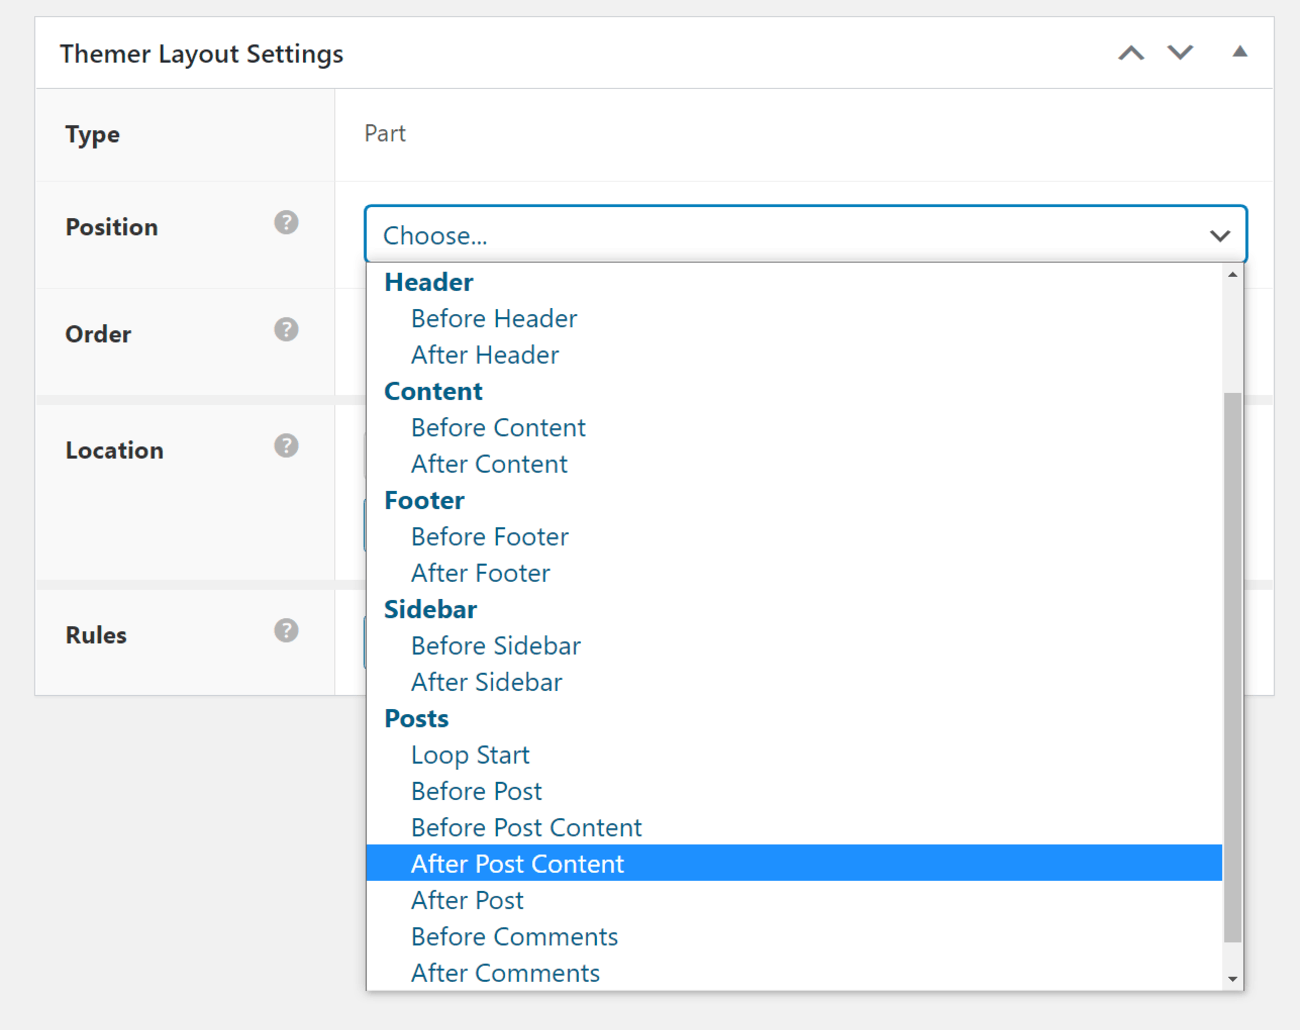
All in all, this is another advanced feature that adds some useful possibilities for building custom WordPress sites.
Beaver Themer Pricing
Beaver Themer itself costs $147 for use on unlimited sites. However, you’ll also need the premium version of the core Beaver Builder plugin to use it. If you don’t already have that, it will cost you another $99.
Beaver Themer Review FAQ
Let’s finish things out with some common questions you might have…
What is Beaver Themer?
Beaver Themer is an official extension for Beaver Builder that lets you use the Beaver Builder interface to design your entire theme including headers, footers, blog templates, blog lists, and more.
How do I install Beaver Themer?
Beaver Themer is a WordPress plugin, so you can install it just like any other WordPress plugin (go to Plugins → Add New → Upload and upload the ZIP file).
Will Beaver Themer work with any WordPress theme?
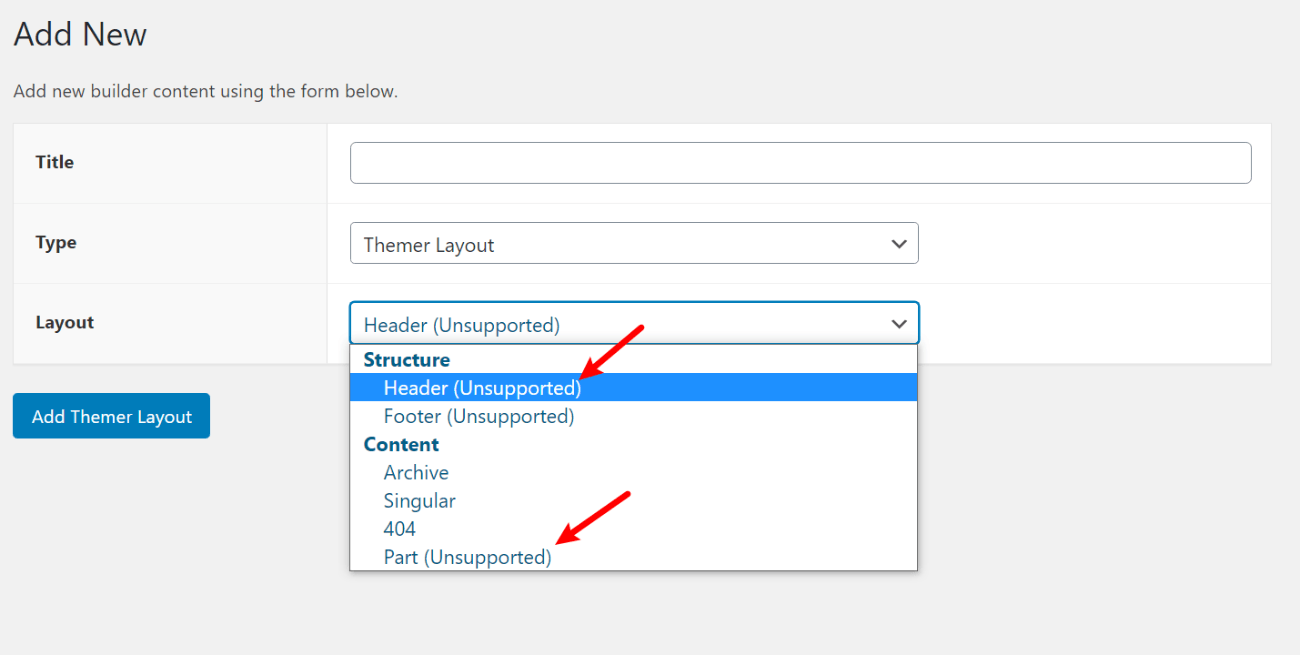
Yes and no. You’ll be able to use Beaver Themer to design the single post and archive templates with any theme. However, your theme needs to be coded in a certain way to customize the header or footer.
When you go to create a new themer layout, Beaver Themer will tell you whether or not your current theme supports the different template parts:
Can I use Beaver Themer with the free version of Beaver Builder?
No. To use Beaver Themer, you need the premium version of Beaver Builder. It will not work with the free version at WordPress.org.
How much does Beaver Themer cost?
Beaver Themer costs $147 for use on unlimited websites.
Does Beaver Themer work for WooCommerce stores?
Yes! Beaver Themer lets you design both your single product pages and your store listing/category pages.
Beaver Themer Review Final Thoughts
Overall, Beaver Themer is an excellent option if you already use and prefer the Beaver Builder page builder plugin.
In my opinion, one of its strongest points is that it lets you control not just where your templates appear, but also who sees them. You can target templates by logged-in status, user role, and lots of other user-specific features, which is more than many other theme builders offer you.
With that being said, if you aren’t set on Beaver Builder itself, you might be able to find better value from some other tools, especially if you only need a theme builder for a single site. Additionally, Beaver Themer has some limitations, such as only supporting header/footer building for a limited number of themes (though you can design singles/archives for any theme).
One place to start would be Elementor Pro. Not only does Elementor Pro give you more features and fully work with any theme, but it also only costs $49 for use on a single site (vs $246 for Beaver Builder + Themer). You can learn more in our full Elementor review.
If you’re a more advanced user, another good option is Oxygen, which is also much cheaper at $99 for use on unlimited sites and lifetime updates. However, note that Oxygen is a little different in that it completely replaces your entire theme, rather than just specific parts like Beaver Themer allows for. You can learn more in our Oxygen review.
Finally, Divi also added full theme building support in version 4.0, which makes it another viable alternative to Beaver Themer. You can check out our review of those new features in our Divi theme review.
Overall, Beaver Themer is a well-coded and reliable tool that makes a great option if you love the Beaver Builder interface and/or want those advanced display conditions. Otherwise, you might be able to save a big chunk of money by using something like Elementor Pro.
If you want to test it out, you can play around with a full Beaver Themer demo here.
Still have any questions about our Beaver Themer review? Ask us in the comments!


Leave a Reply